> For the complete documentation index, see [llms.txt](https://interfacing.gitbook.io/interfacing-help-files/llms.txt). Markdown versions of documentation pages are available by appending `.md` to page URLs; this page is available as [Markdown](https://interfacing.gitbook.io/interfacing-help-files/interfacing-help-files-fr/administration-and-configuration/configuring-application-settings/contractor-application-settings/contractor-types-and-documents.md).
# Contractor Types & Documents
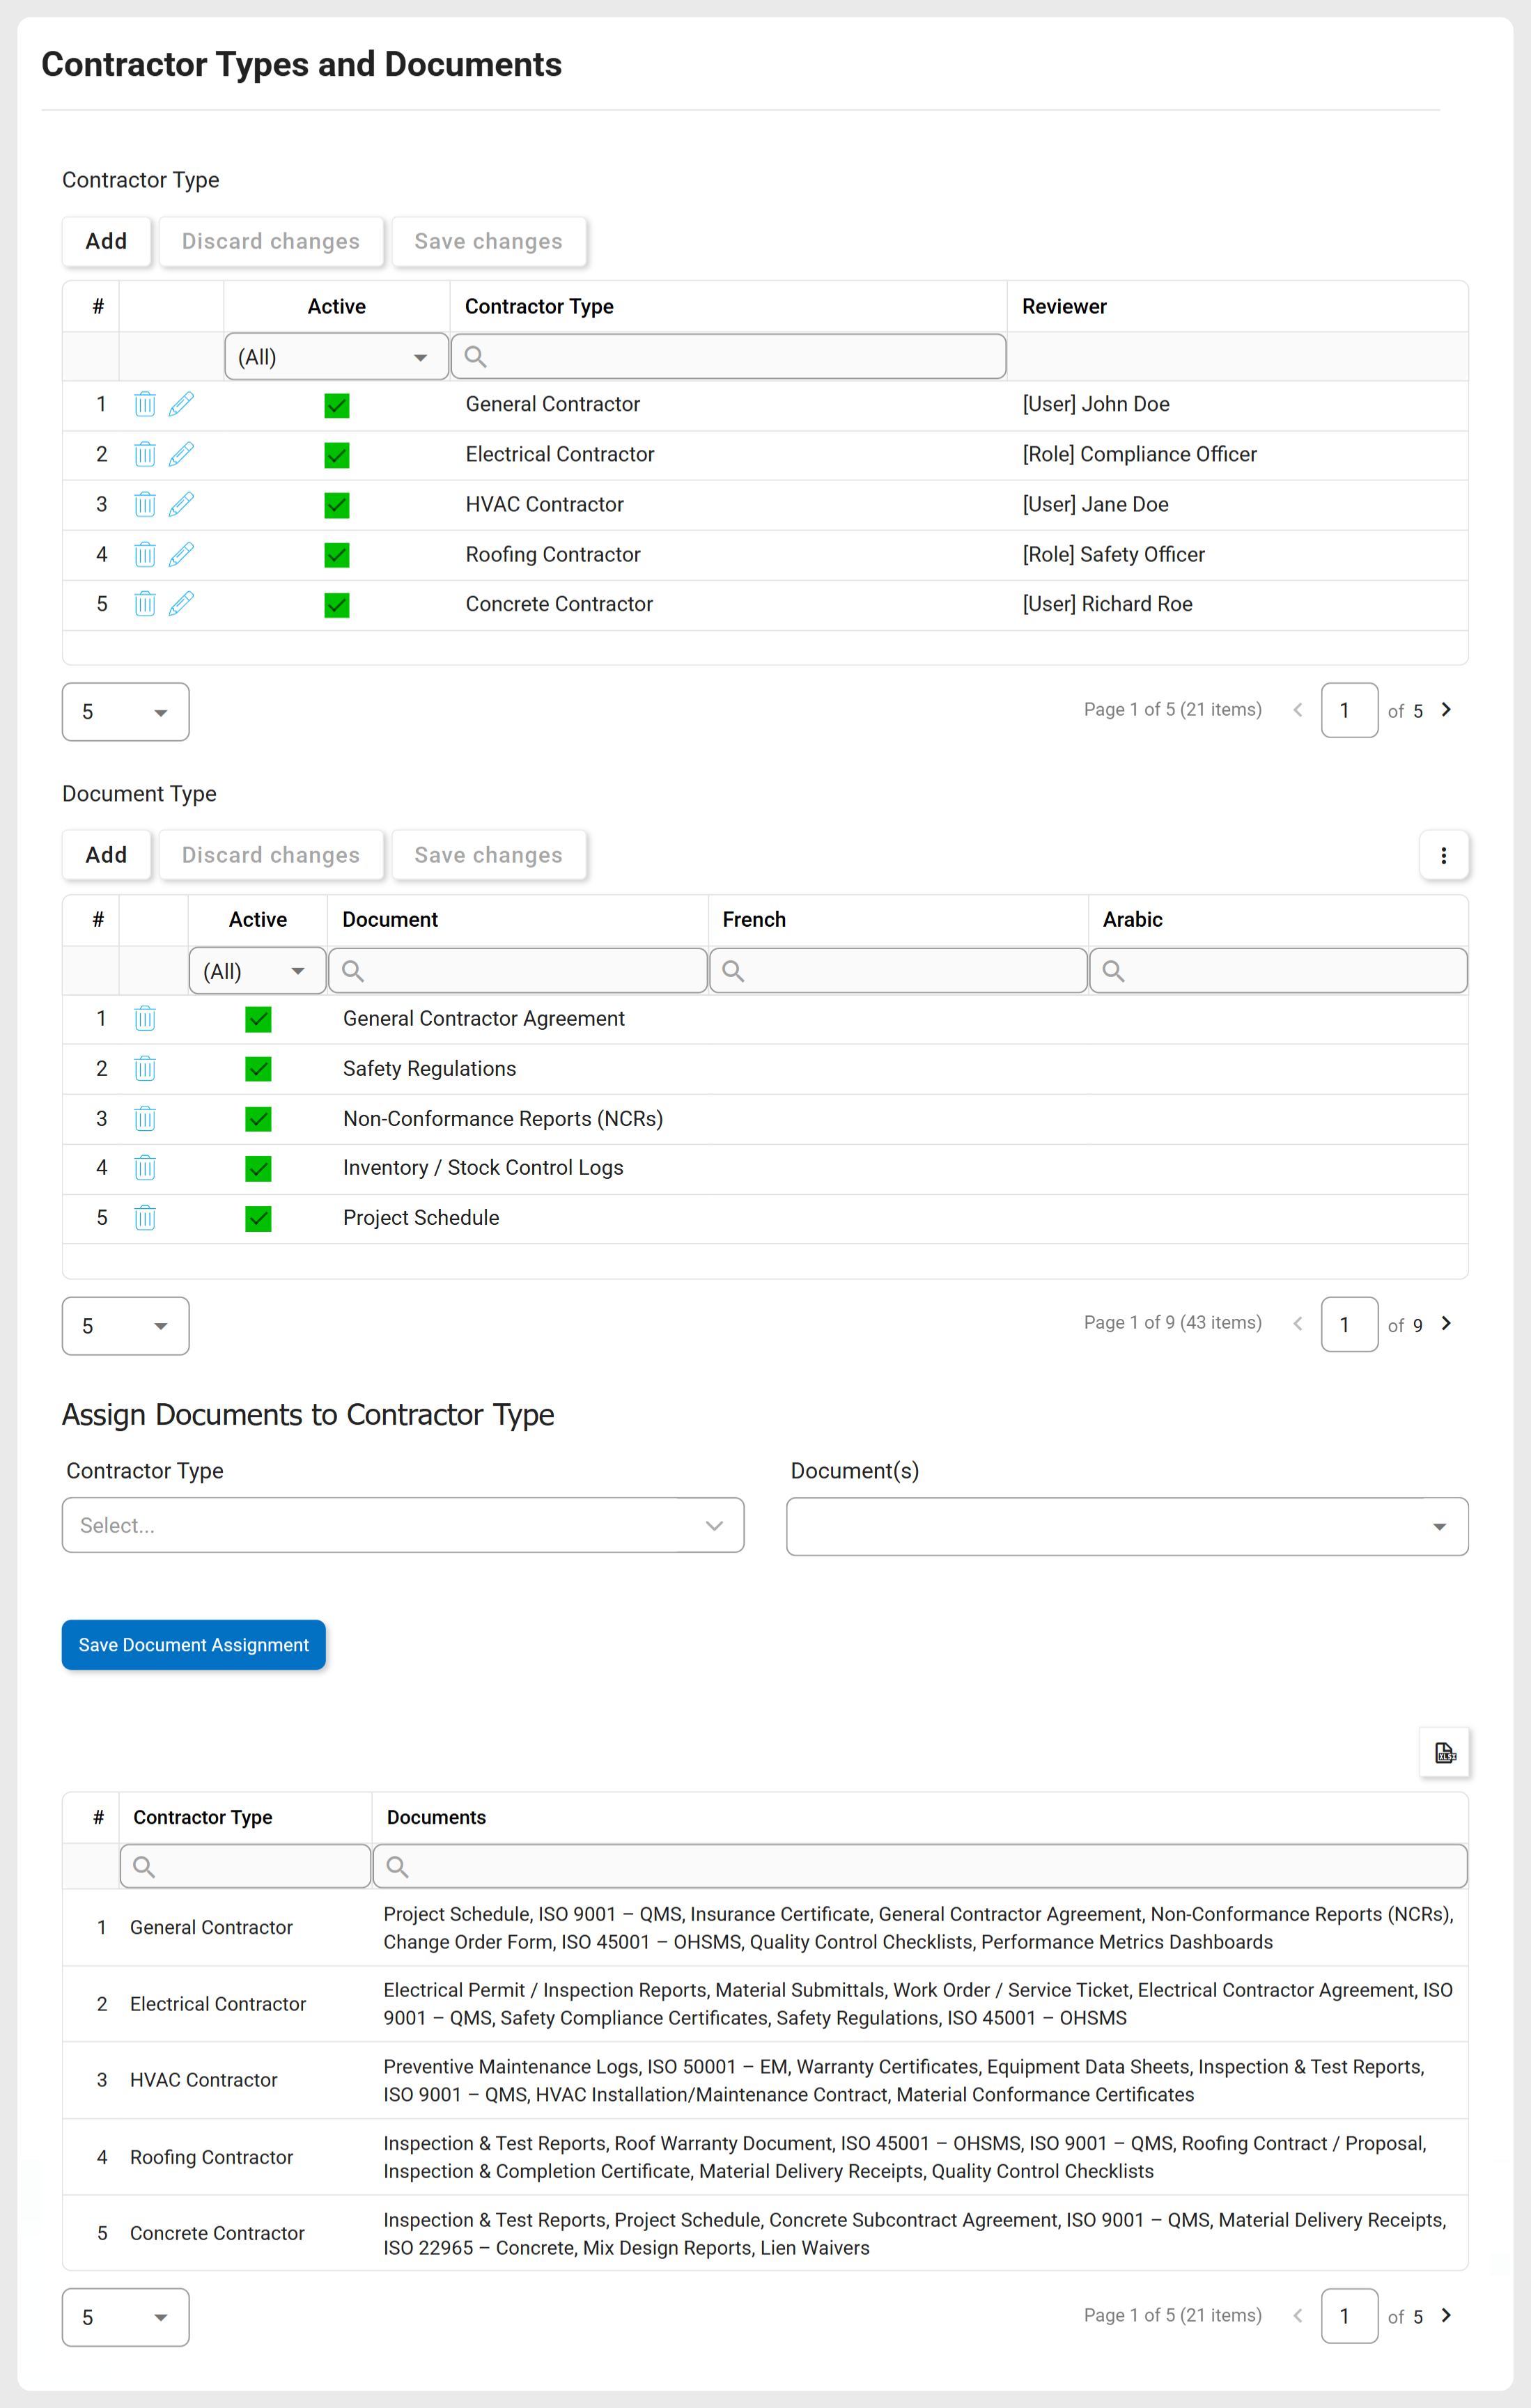
Define contractor types, assign reviewers, and link associated documents.
## Overview
The **Contractor Types & Documents** module provides tools to manage contractor classifications and their associated requirements. It allows you to:
* **Define & Manage Contractor Types**
* Create and maintain categories for different types of contractors based on business needs.
* **Define & Manage Required Documents**
* Configure the compliance and onboarding documents required for each contractor type.
* **Assign Reviewers**
* Designate reviewers responsible for validating and approving requests per contractor type.
***
## How Settings Are Applied
Contractor types created in this module appear in the **Contractor Type** dropdown of the [**New Contractor**](/interfacing-help-files/interfacing-help-files-fr/supplier-and-product-management/contractor-application/navigating-the-contractor-management-workflow/create-new-contractor-request.md) form.
{% hint style="warning" %}
When a contractor type is selected:
* Associated documents automatically populate the [**Required Documents**](https://interfacing.gitbook.io/interfacing-help-files/~/changes/552/supplier-and-asset-management-suggested/contractor-application/navigating-the-contractor-management-workflow/create-new-contractor-request#manage-required-documents) grid.
* Users can add to or remove these documents as needed.
* Upon submission, the request is routed to the assigned reviewer.
{% endhint %}
***
## Configuring Contractor Types & Reviewers
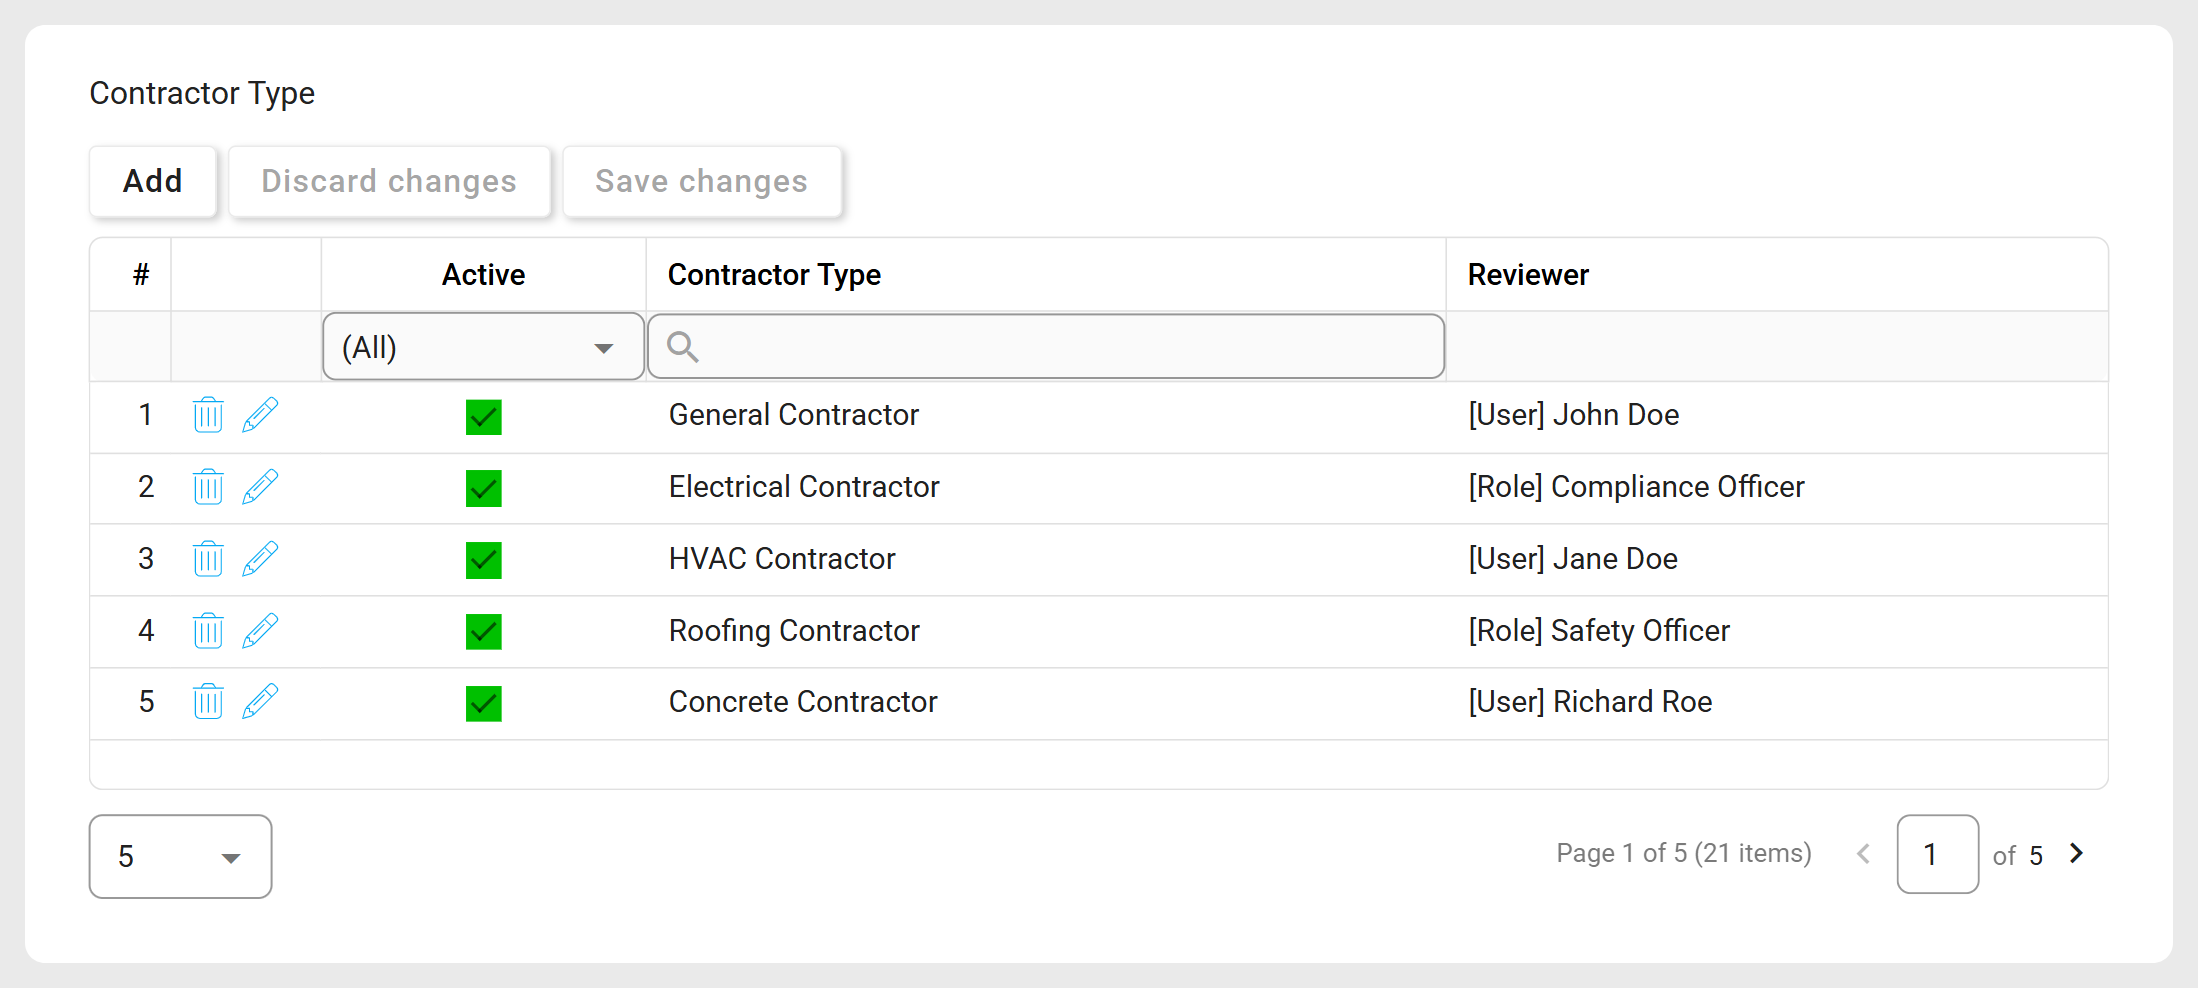
Use this section to create and manage contractor types and their assigned reviewers.
{% stepper %}
{% step %}
### Defining Contractor Types
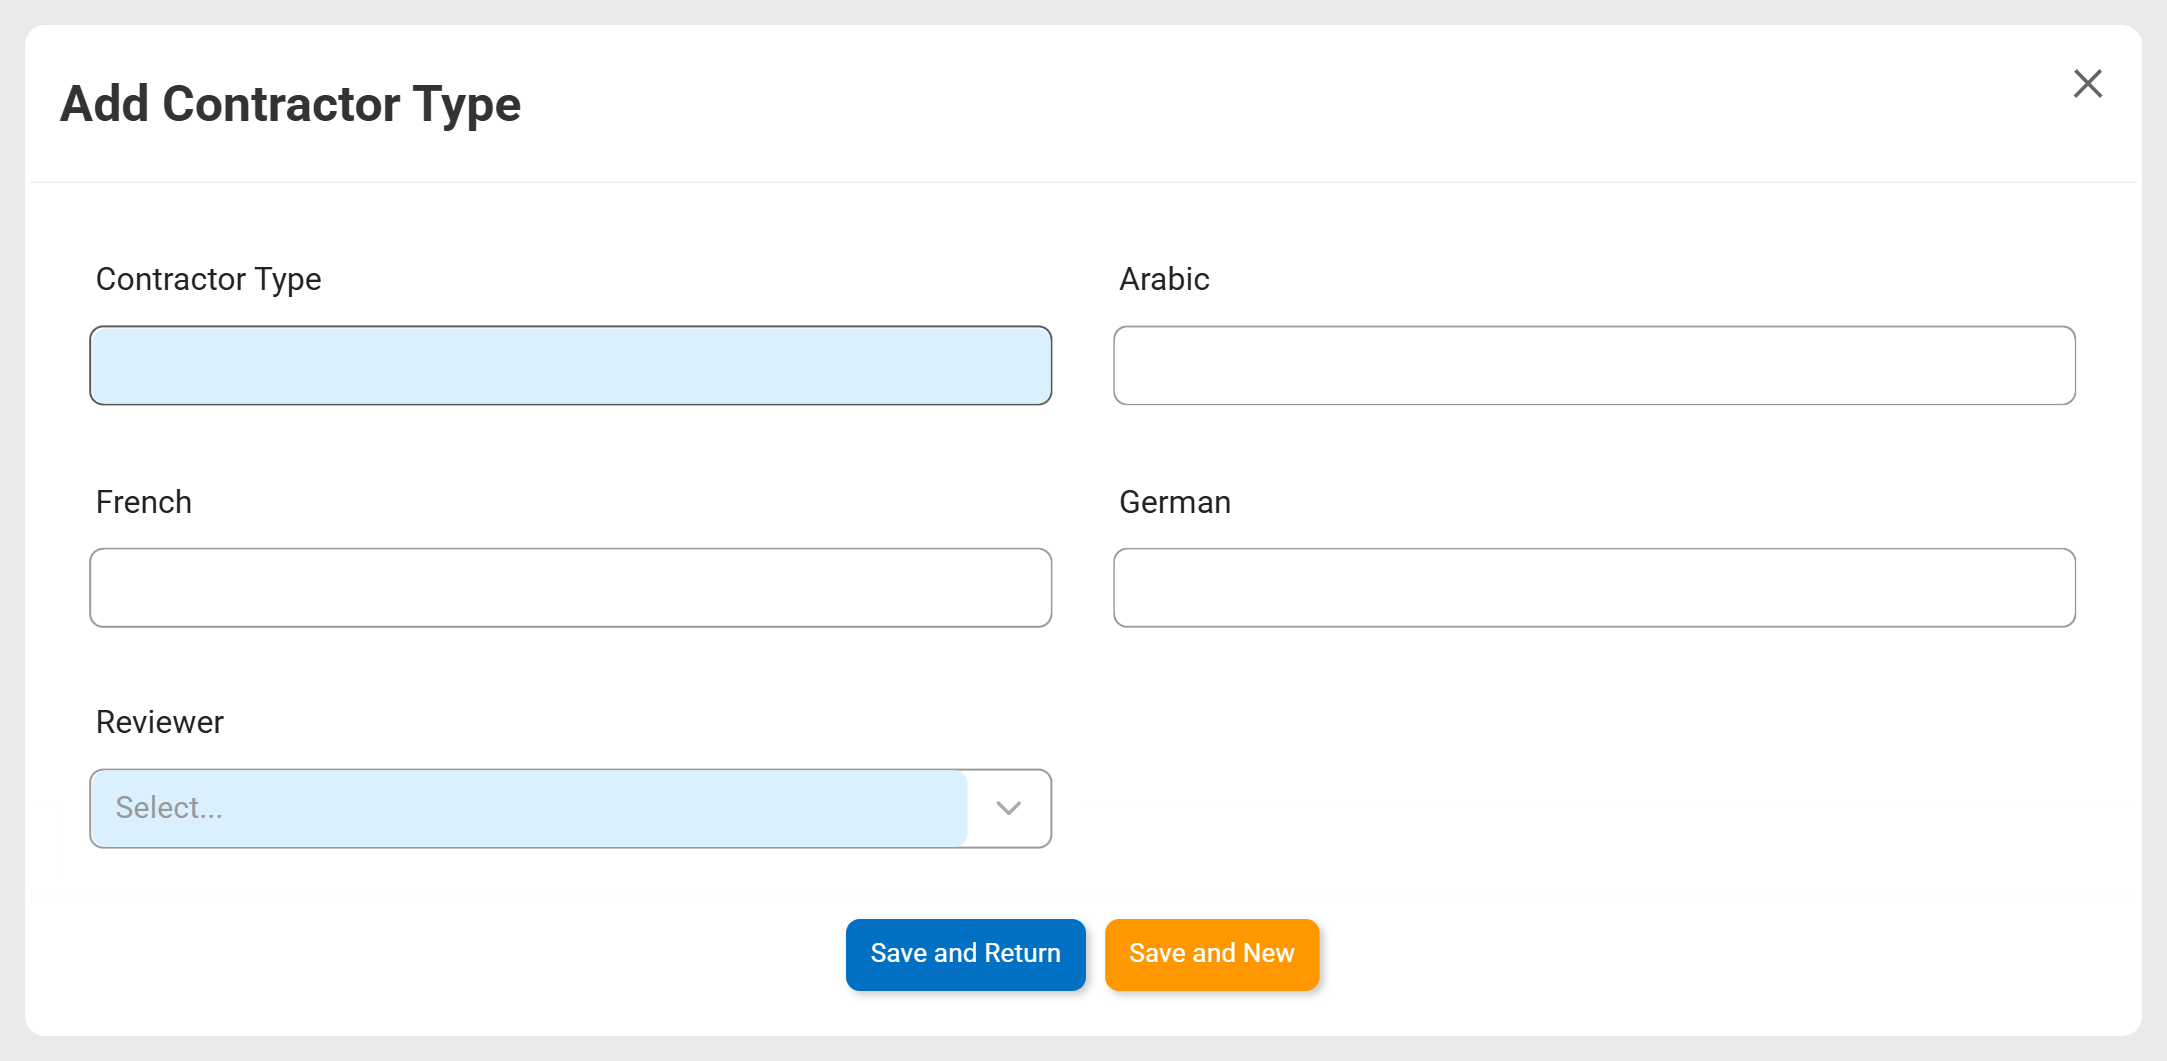
Click **Add** to create a new contractor type and assign its reviewer.
Add Contractor Type
The **Add Contractor Type** form allows you to define new contractor types and assign appropriate reviewers.
***
{% hint style="danger" %}
Ensure all required fields (highlighted in **yellow**) are completed before saving.
{% endhint %}
1. **Define Details**
Complete the relevant fields to configure the contractor type.
* **Contractor Type:** Enter a descriptive name for the contractor type.
{% hint style="info" %}
If needed, provide translations in the supported languages:
* **English (default)**
* **French**
* **Arabic**
* **German**
{% endhint %}
* **Reviewer:** Select the party responsible for reviewing the contractor type.
{% hint style="info" %}
The **Reviewer** dropdown dynamically loads active users, roles, and groups in the system. These entities are managed in **Library** > **Organization**.
{% endhint %}
***
2. **Save Changes**
When ready to save, choose one of the following options:
* **Save and Return:** Click to save the contractor type and return to the main form.
* **Save and New:** Click to save the contractor type and open a new form to create another.
***
{% endstep %}
{% step %}
### Managing Contractor Types
Once a contractor type is defined, the following actions are available:
* **Edit:** Modify an existing contractor type either **inline** or using a **modal form**.
* **Inline Editing:**
* Update the **Active** status by checking or unchecking the box in the **Active** column.
Only active contractor types appear in the Contractor Type dropdown.
* Reassign the reviewer by clicking the **Reviewer** cell and selecting a new party.
* **Modal Editing:**
* Click the **Edit** (:pencil:) icon or double-click the entry to open the editing form.
* **Delete** (:trash-can:): Click to remove a category.
{% hint style="info" %}
Confirm deletion by clicking **Save Changes** or clicking outside the grid. To cancel, click **Discard Changes** or **Undo** (:arrow-rotate-left:).
{% endhint %}
***
{% endstep %}
{% endstepper %}
***
## Configuring Required Documents
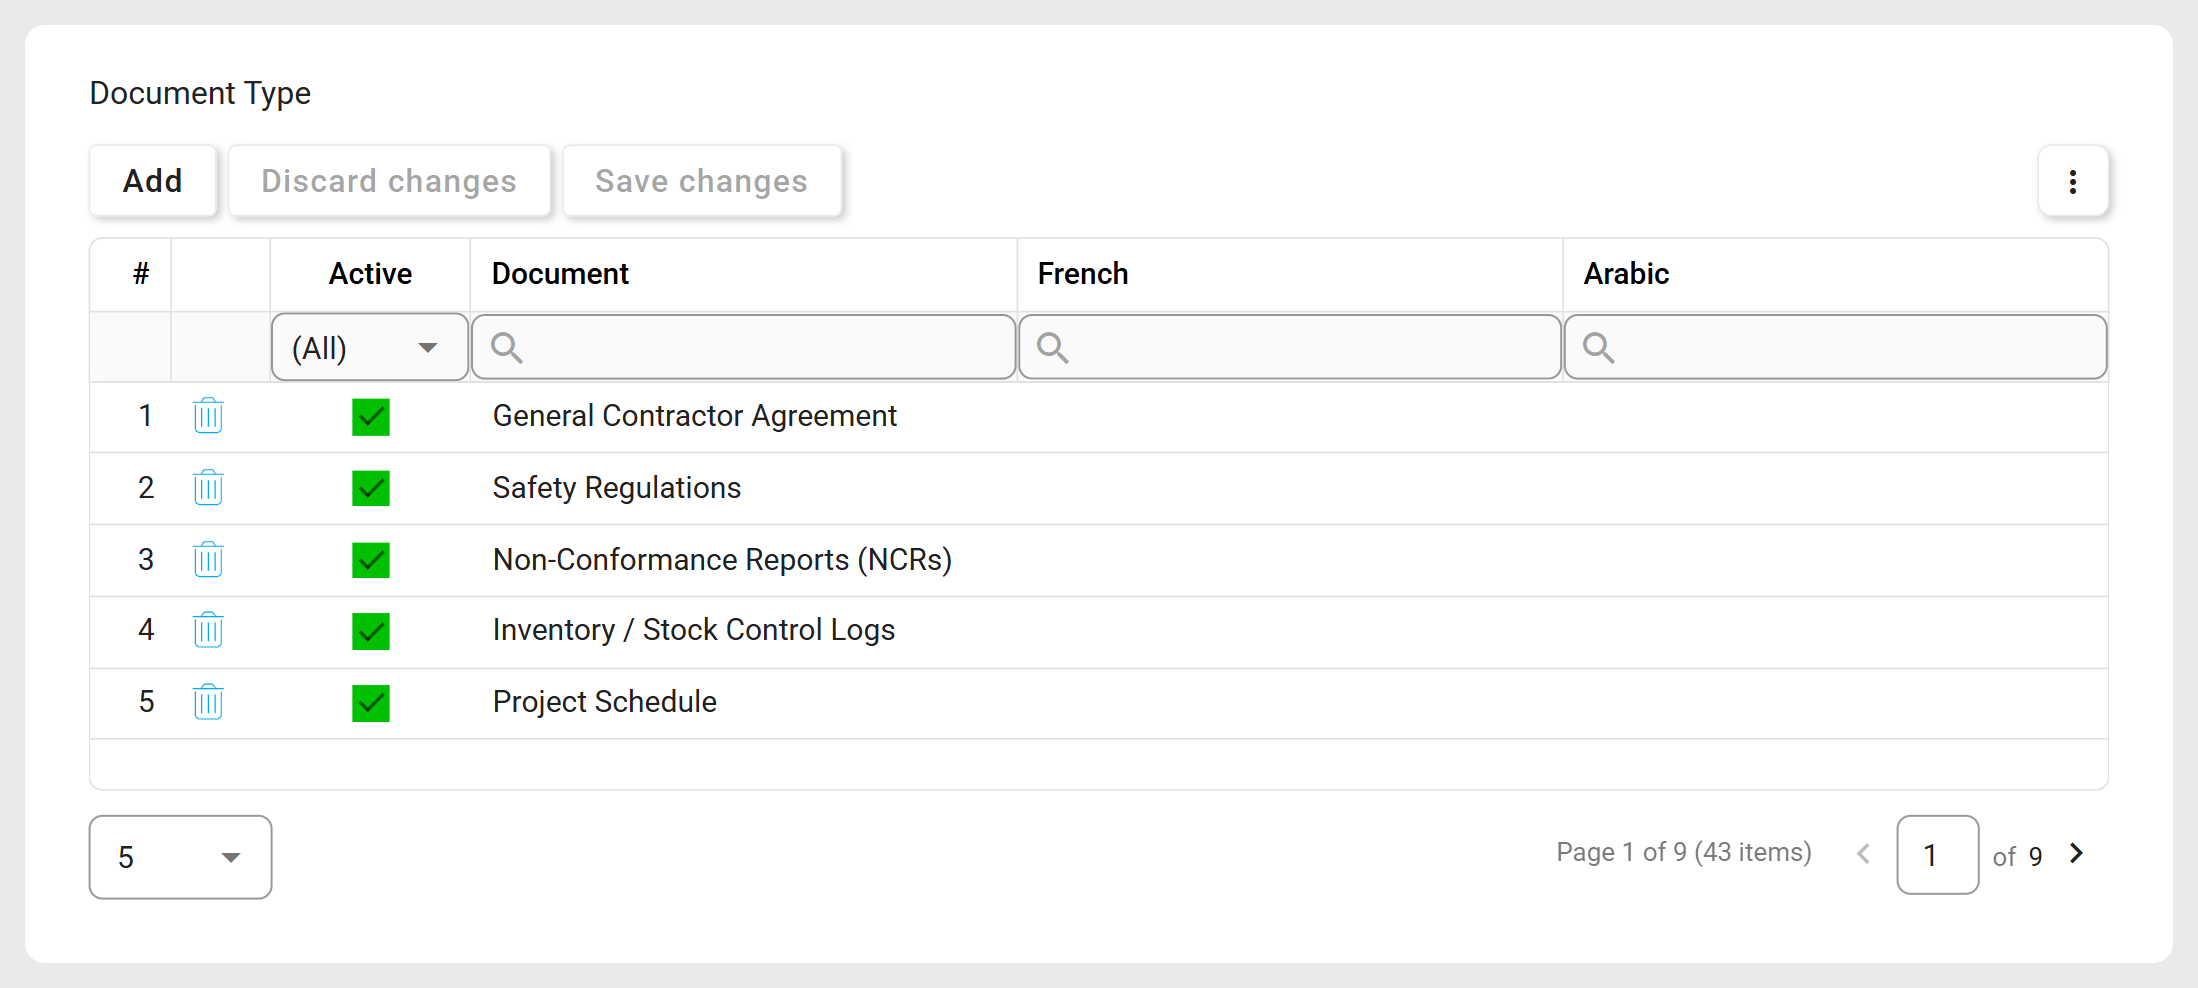
Use this section to create and manage required documents.
{% stepper %}
{% step %}
### Defining Document Types
Click **Add** to create a new document type. A new row will appear in the grid.
* **Active:** Select to make the option visible in the **Document(s)** dropdown. Leave unselected to hide it.
* **Document:** Enter a descriptive name for the document.
{% hint style="info" %}
If needed, provide translations in the supported languages:
* **English (default)**
* **French**
* **Arabic**
* **German**
{% endhint %}
***
{% endstep %}
{% step %}
### Managing Document Types
Once a document type is defined, the following actions are available:
* **Edit:** Click directly in a grid cell to modify its contents.
* **Delete** (:trash-can:): Click to remove a document type.
{% hint style="info" %}
Confirm deletion by clicking **Save Changes** or clicking outside the grid. To cancel, click **Discard Changes** or **Undo** (:arrow-rotate-left:).
{% endhint %}
***
{% endstep %}
{% step %}
### Saving & Discarding Changes
After making changes, choose one of the following:
* [**Save Changes**](#user-content-fn-1)[^1]**:** Click to apply modifications.
* **Discard Changes:** Click to revert any unsaved modifications.
***
{% endstep %}
{% endstepper %}
***
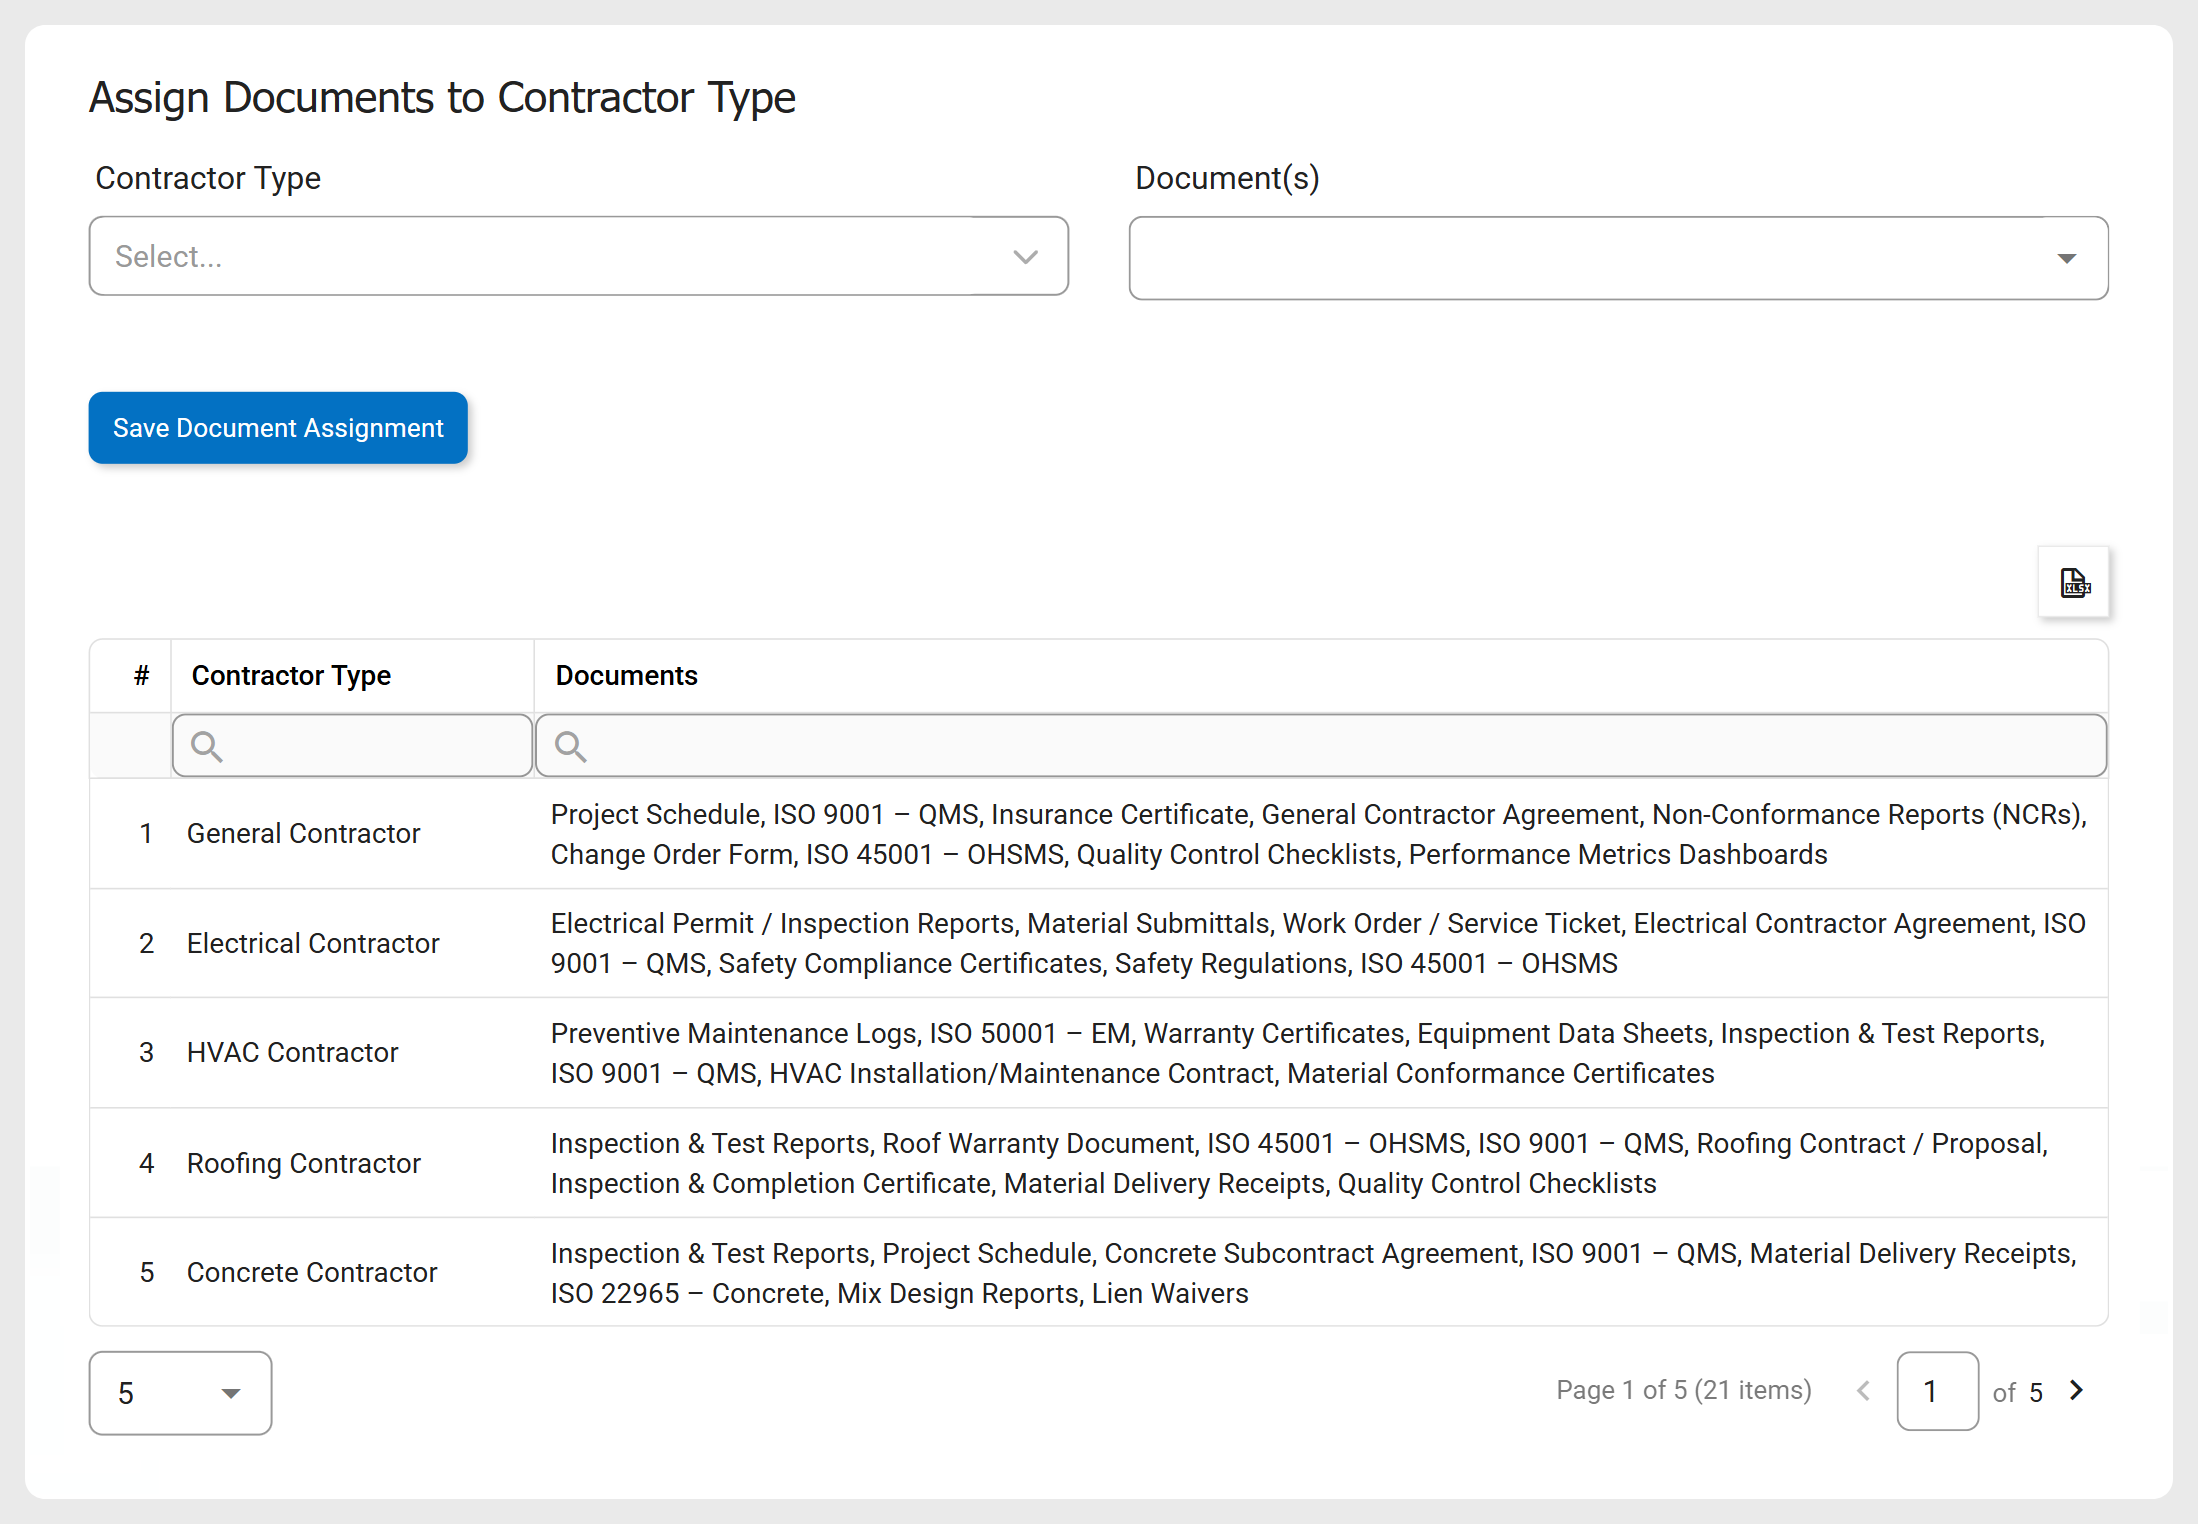
## Assigning Documents to Contractor Types
Use this section to link documents to contractor types.
{% stepper %}
{% step %}
### Choose Contractor Type & Documents
Use the dropdowns to select the contractor type and associated document(s).
***
{% endstep %}
{% step %}
### Save Assignment
Click **Save Document Assignment** to link the documents to the selected contractor type.
{% hint style="info" %}
Assigned documents appear in the summary grid, showing all document requirements per contractor type.
* To update, reselect the contractor type and add or remove documents as needed.
{% endhint %}
***
{% endstep %}
{% endstepper %}
***
## See Also
Cover image
How to Export, Import, or Generate Templates
Export data, import files, or generate templates from the grid menu, as applicable.
[^1]: You can also **click outside the grid** to save your changes instantly.
---
# Agent Instructions
This documentation is published with GitBook. GitBook is the documentation platform designed so that both humans and AI agents can read, navigate, and reason over technical content effectively. Learn more at gitbook.com.
## Querying This Documentation
If you need additional information that is not directly available in this page, you can query the documentation dynamically by asking a question.
Perform an HTTP GET request on the current page URL with the `ask` query parameter, and the optional `goal` query parameter:
```
GET https://interfacing.gitbook.io/interfacing-help-files/interfacing-help-files-fr/administration-and-configuration/configuring-application-settings/contractor-application-settings/contractor-types-and-documents.md?ask=&goal=
```
`ask` is the immediate question: it should be specific, self-contained, and written in natural language.
`goal` is optional and describes the broader end goal you are ultimately trying to accomplish on behalf of the user. GitBook uses it to tailor the answer towards what is most useful for that goal.
The response will contain a direct answer to the question and relevant excerpts and sources from the documentation.
Use this mechanism when the answer is not explicitly present in the current page, you need clarification or additional context, or you want to retrieve related documentation sections.