> For the complete documentation index, see [llms.txt](https://interfacing.gitbook.io/interfacing-help-files/llms.txt). Markdown versions of documentation pages are available by appending `.md` to page URLs; this page is available as [Markdown](https://interfacing.gitbook.io/interfacing-help-files/interfacing-help-files-fr/analystes-de-processus/business-process-management/creating-and-editing-process-diagrams/mapping-a-process.md).

# Mapping a Process

Start building your process diagram by opening the **Map Shapes Panel** from the toolbar. This panel contains all elements needed to structure your workflow.

<details>

<summary><mark style="color:blue;"><strong>Map Shapes Panel</strong></mark></summary>

The **Map Shapes Panel** contains all supported BPMN flow objects and related elements. Use the table below to identify available shapes and understand their purposes.

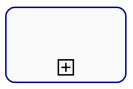
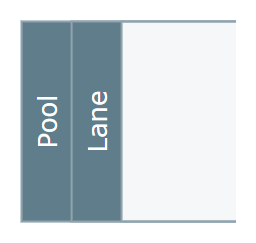
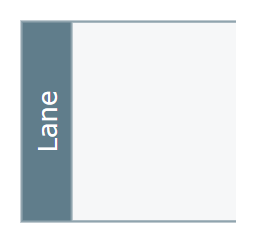
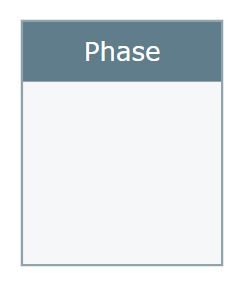
<table><thead><tr><th width="203">Shape</th><th width="133" align="center">Symbol</th><th>Description</th></tr></thead><tbody><tr><td><strong>Subprocess</strong> or <strong>Shortcut</strong></td><td align="center"><div><figure><img src="https://content.gitbook.com/content/AgpNu7XmgN3Z9B8kIShD/blobs/b21CzCv6lwU7G56UXxYv/image.png" alt="" width="67"><figcaption></figcaption></figure></div></td><td><p>A <strong>subprocess</strong> represents a group of related activities that collectively form a business process. </p><p>A <strong>shortcut</strong> links to a subprocess used in another process.</p></td></tr><tr><td><strong>Task</strong></td><td align="center"><div><figure><img src="https://content.gitbook.com/content/AgpNu7XmgN3Z9B8kIShD/blobs/IMvxW9zrBP0vCrzDfmMC/image.png" alt="" width="66"><figcaption></figcaption></figure></div></td><td>A <strong>task</strong> represents a single unit of work or activity within the process</td></tr><tr><td><strong>Gateway</strong></td><td align="center"><div><figure><img src="https://content.gitbook.com/content/AgpNu7XmgN3Z9B8kIShD/blobs/8fL7VuJecHWY78c1TShF/image.png" alt="" width="46"><figcaption></figcaption></figure></div></td><td>A <strong>gateway</strong> controls the branching (divergence) and merging (convergence) of sequence flows based on conditions or events.</td></tr><tr><td><strong>Start Event</strong></td><td align="center"><div><figure><img src="https://content.gitbook.com/content/AgpNu7XmgN3Z9B8kIShD/blobs/gZyljY6rUofjjMbAF29x/image.png" alt="" width="43"><figcaption></figcaption></figure></div></td><td>A <strong>start event</strong> marks the beginning of a process.</td></tr><tr><td><strong>Intermediate Event</strong></td><td align="center"><div><figure><img src="https://content.gitbook.com/content/AgpNu7XmgN3Z9B8kIShD/blobs/Oi1gfZYDkK40NjwpazUY/image.png" alt="" width="45"><figcaption></figcaption></figure></div></td><td>An <strong>intermediate event</strong> occurs between the start and end of a process. It indicates a triggering condition that may alter the process flow.</td></tr><tr><td><strong>End Event</strong></td><td align="center"><div><figure><img src="https://content.gitbook.com/content/AgpNu7XmgN3Z9B8kIShD/blobs/62SPEheUT0eHbbCQ3gD0/image.png" alt="" width="46"><figcaption></figcaption></figure></div></td><td>An <strong>end event</strong> marks the completion of a process.</td></tr><tr><td><strong>Artifact</strong></td><td align="center"><div><figure><img src="https://content.gitbook.com/content/AgpNu7XmgN3Z9B8kIShD/blobs/EUjUPdQInP931Nf9MnNr/image.png" alt="" width="42"><figcaption></figcaption></figure></div></td><td>An <strong>artifact</strong> represents supporting data objects—such as input, output, or reference data—used in the process.</td></tr><tr><td><strong>Data Store</strong></td><td align="center"><div><figure><img src="https://content.gitbook.com/content/AgpNu7XmgN3Z9B8kIShD/blobs/kazVqY53ryr3QhKnn9DP/image.png" alt="" width="45"><figcaption></figcaption></figure></div></td><td>A <strong>data store</strong> is a place where the process can read or write data.</td></tr><tr><td><strong>Pool</strong></td><td align="center"><div><figure><img src="https://content.gitbook.com/content/AgpNu7XmgN3Z9B8kIShD/blobs/8qe5JsvEb1mQq6Am0GZR/IMS-V16-Library-Edit-Proc-Map-Shapes.png" alt="" width="128"><figcaption></figcaption></figure></div></td><td>A <strong>pool</strong>, represents a participant (e.g., organization or system) in the process.</td></tr><tr><td><strong>Lane</strong></td><td align="center"><div><figure><img src="https://content.gitbook.com/content/AgpNu7XmgN3Z9B8kIShD/blobs/Z4YeR0RtcjkxvZgu0pQa/IMS-V16-Library-Edit-Proc-Map-Shapes-2.png" alt="" width="128"><figcaption></figcaption></figure></div></td><td>A <strong>lane</strong> divides the pool by function or responsibility (e.g., roles, departments, assets, or resources).</td></tr><tr><td><strong>Phase</strong></td><td align="center"><div><figure><img src="https://content.gitbook.com/content/AgpNu7XmgN3Z9B8kIShD/blobs/h8DmTkirboHSrnIjaiGu/IMS-V16-Library-Edit-Proc-Map-Shapes-1.png" alt="" width="122"><figcaption></figcaption></figure></div></td><td>A <strong>phase</strong> segments a process into logical groupings—such as stages or milestones—for clarity and tracking.</td></tr></tbody></table>

</details>

{% hint style="info" %}
The platform supports **BPMN 2.0** as the standard for visualizing business processes.&#x20;

* For more information, see [**Glossary & Key Concepts: BPMN**](/interfacing-help-files/interfacing-help-files-fr/getting-started/glossary-and-key-concepts.md#bpmn).
  {% endhint %}

***

\[...]

***

## Defining Swimlanes

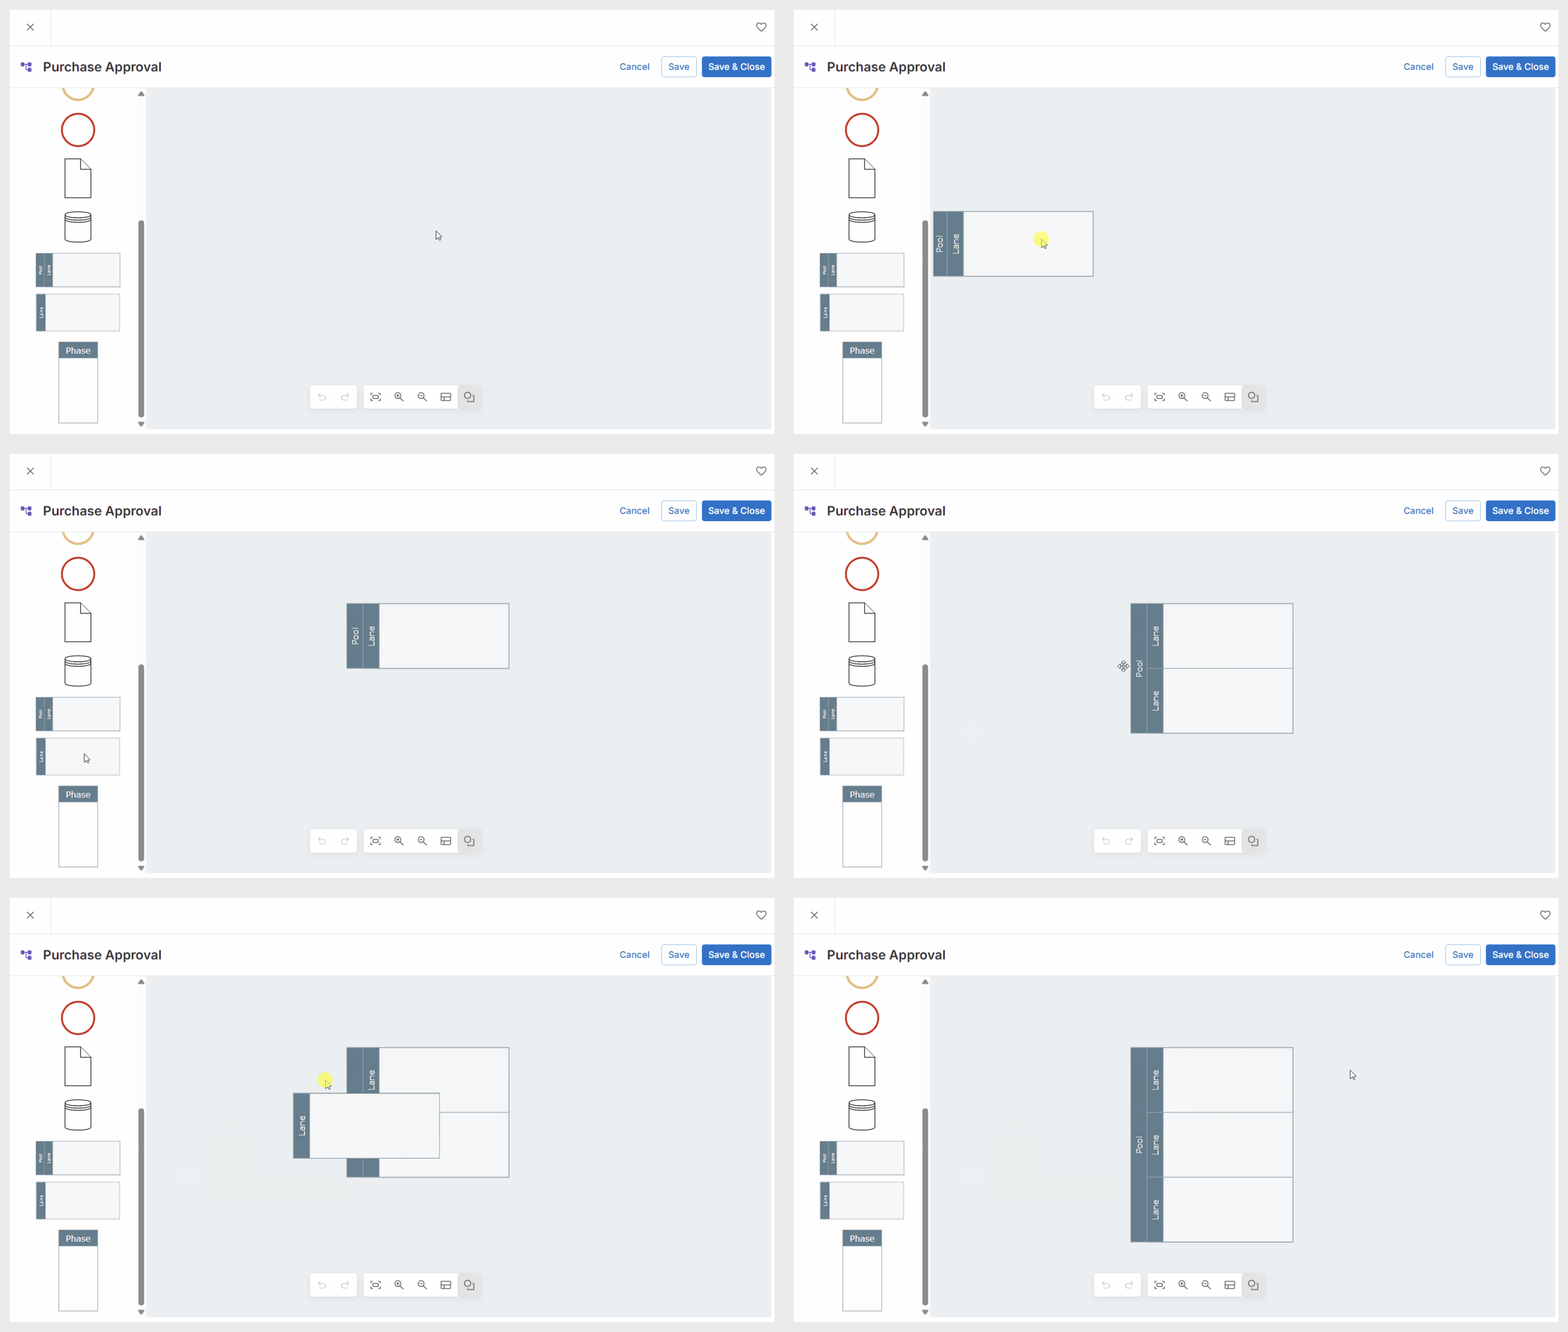
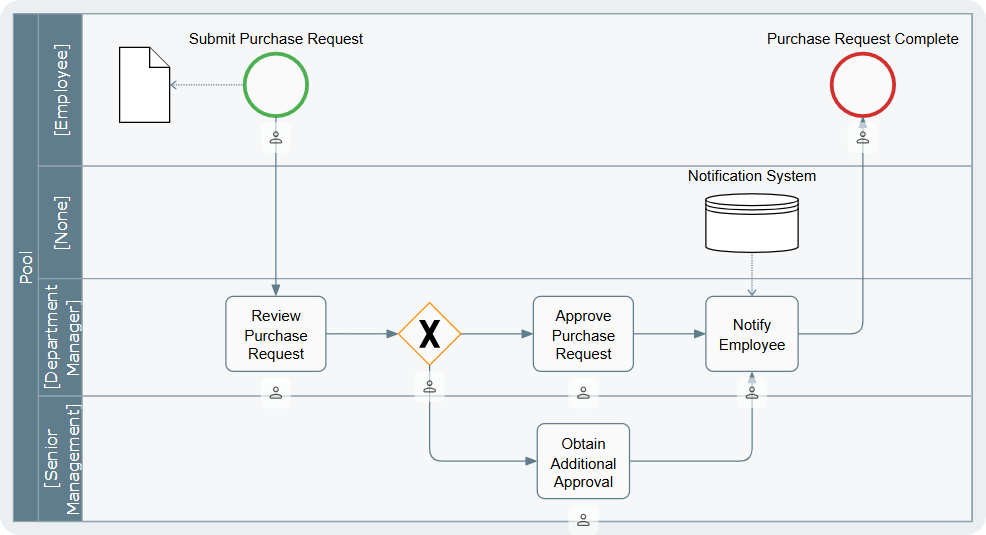
Pools and lanes organize flow objects by responsibility, forming what is commonly called a **swimlane diagram**.

* **Pool**: Represents a participant in the process (e.g., an organization, system, or team).
* **Lane**: Subdivision within a pool used to group activities by function or responsibility.

<figure><img src="https://content.gitbook.com/content/AgpNu7XmgN3Z9B8kIShD/blobs/gL1a8tJOwKL1dQNFzTNv/IMS-V161-BPM-EPD-1.gif" alt=""><figcaption></figcaption></figure>

{% hint style="info" %}
Pools and lanes support BPMN standards and RASCI-VS responsibility assignments, helping clarify ownership within a workflow.
{% endhint %}

{% hint style="danger" %}
Using pools and lanes (swimlanes) is optional when modeling a process. If you prefer a simple flowchart without defined participants or responsibilities, you may skip this step.
{% endhint %}

{% stepper %}
{% step %}

### Adding Pools & Lanes

**To add a pool:**

* Open the **Map Shapes Panel**
* Drag the **Pool** shape onto the canvas.
* Drop it at the desired location. The pool includes one default lane.

**To add a lane to an existing pool:**

* Drag a **Lane** shape onto the pool.
* As you hover, two drop zones will appear.
  * **Upper Zone**  →  Adds a lane above.
  * **Lower Zone**  →  Adds a lane below.
* Drop the shape in desired position.

{% hint style="warning" %}
A diagram can contain multiple pools. Not all pools require additional lanes.
{% endhint %}

***

{% endstep %}

{% step %}

### Adding Lanes Automatically

Lanes can also be added automatically based on object placement or RASCI-VS assignments.&#x20;

The system creates lanes in the following scenarios:

* Objects without an **R** (**Responsible**) assignment are placed in a lane labeled **None**.
* Objects placed **outside a lane** are assigned to **None**.
* **Dragging an object out of a lane** moves it to **None**.
* Adding **a new R assignment** automatically creates a **lane** for that role.

***

{% endstep %}

{% step %}

### Renaming Pools & Lanes

To rename a pool or lane:

* Double-click the pool or lane header.
* Enter the new name in the text field..
* Press <kbd>**Enter**</kbd> or click outside the header to apply the change.

***

{% endstep %}
{% endstepper %}

***

## Defining Shapes

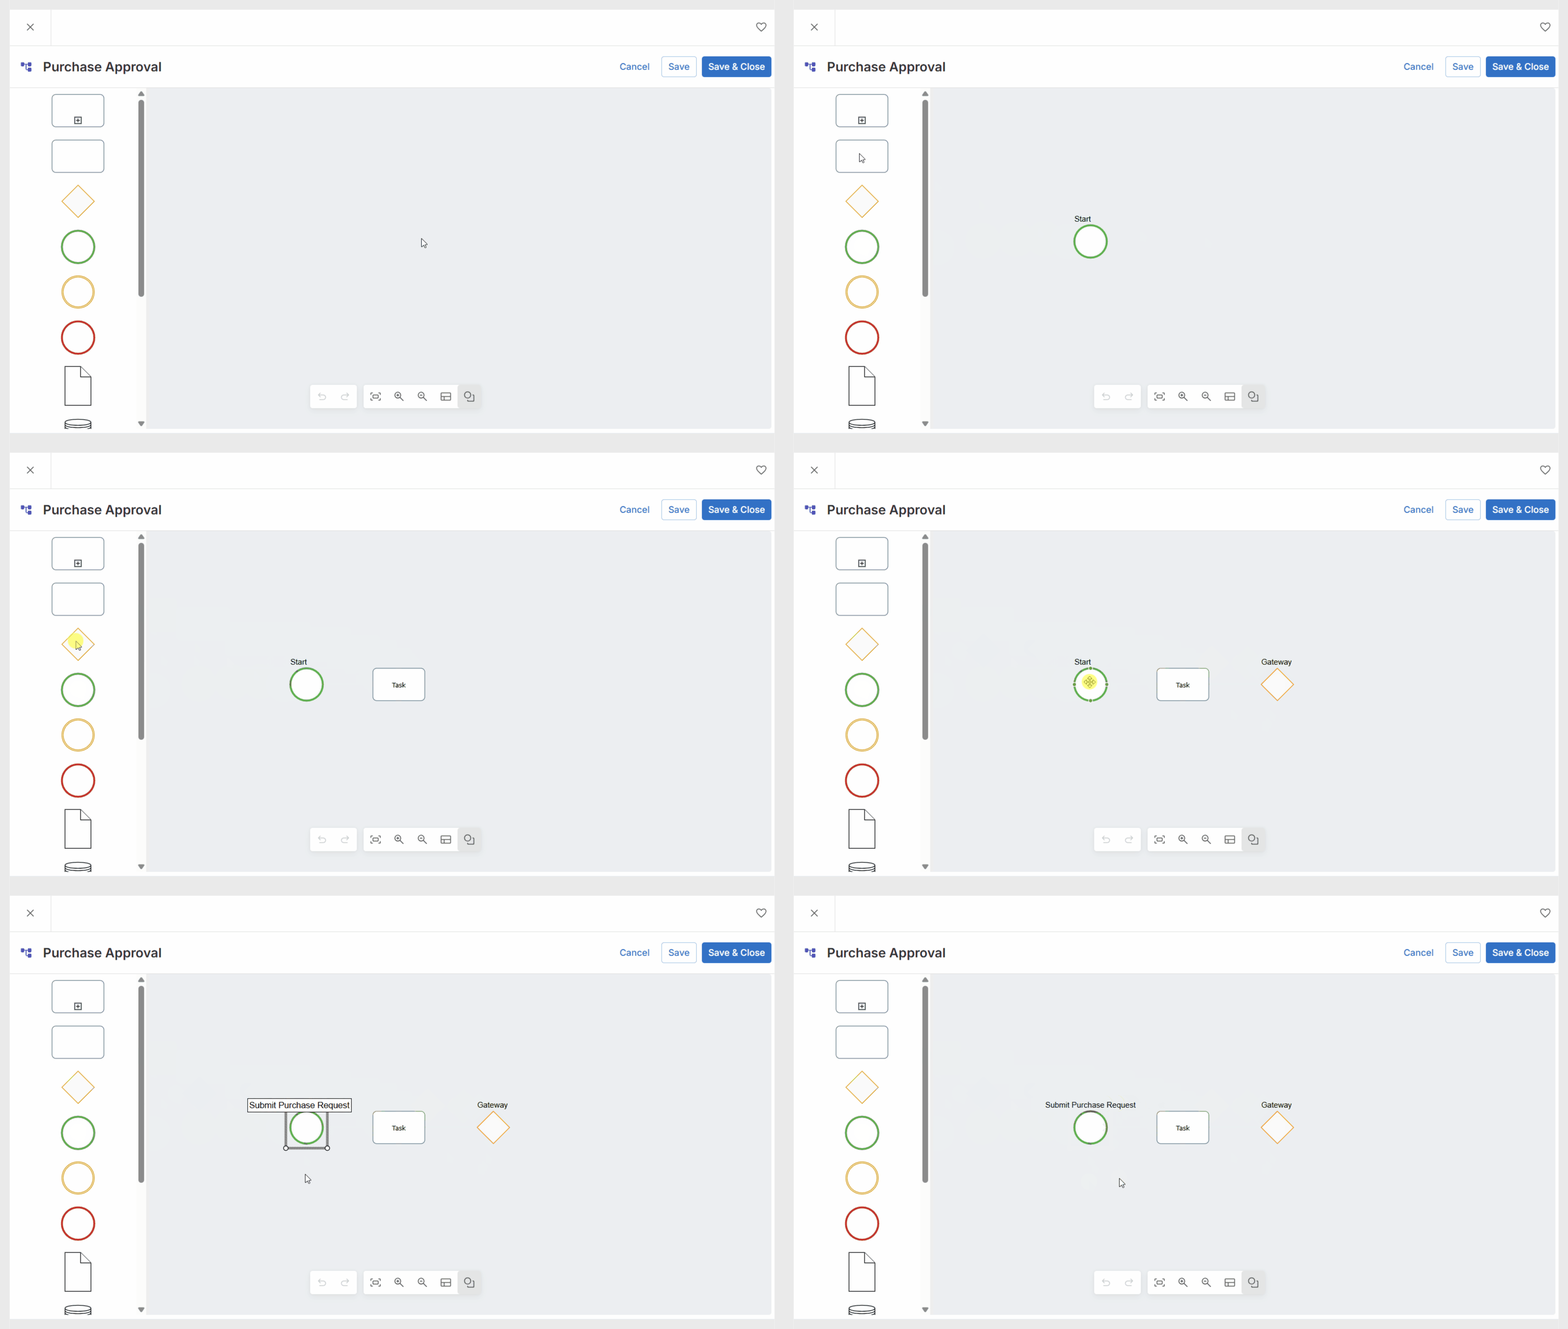
Shapes represent **activities**, **events**, and **decision points** in a process. They form the core building blocks of a BPMN diagram.

<figure><img src="https://content.gitbook.com/content/AgpNu7XmgN3Z9B8kIShD/blobs/y2XktrRva3H9rev39j8q/IMS-V161-BPM-EPD-2.gif" alt=""><figcaption></figcaption></figure>

{% stepper %}
{% step %}

### Adding Shapes

To add a shape:

* Open the **Map Shapes Panel**.
* Drag a shape (e.g., event, task, gateway) onto the canvas.
* Drop it at the desired location.

{% hint style="info" %}
As you add shapes or draw sequence flows, **guide lines** will appear to help with alignment and spacing.
{% endhint %}

{% hint style="warning" %}
Shapes do **not** have to be inside a lane; for example, a start event can exist outside of a pool or lane.
{% endhint %}

***

{% endstep %}

{% step %}

### Renaming Shapes

To rename a shape:

* Double-click the object on the canvas.
* Enter the new name in the text field that appears.
* Press <kbd>**Enter**</kbd> or click outside the shape to apply the change.

{% hint style="info" %}
To reposition a label, hover over it, then click and drag to the desired location.
{% endhint %}

***

{% endstep %}
{% endstepper %}

***

## Connecting Shapes

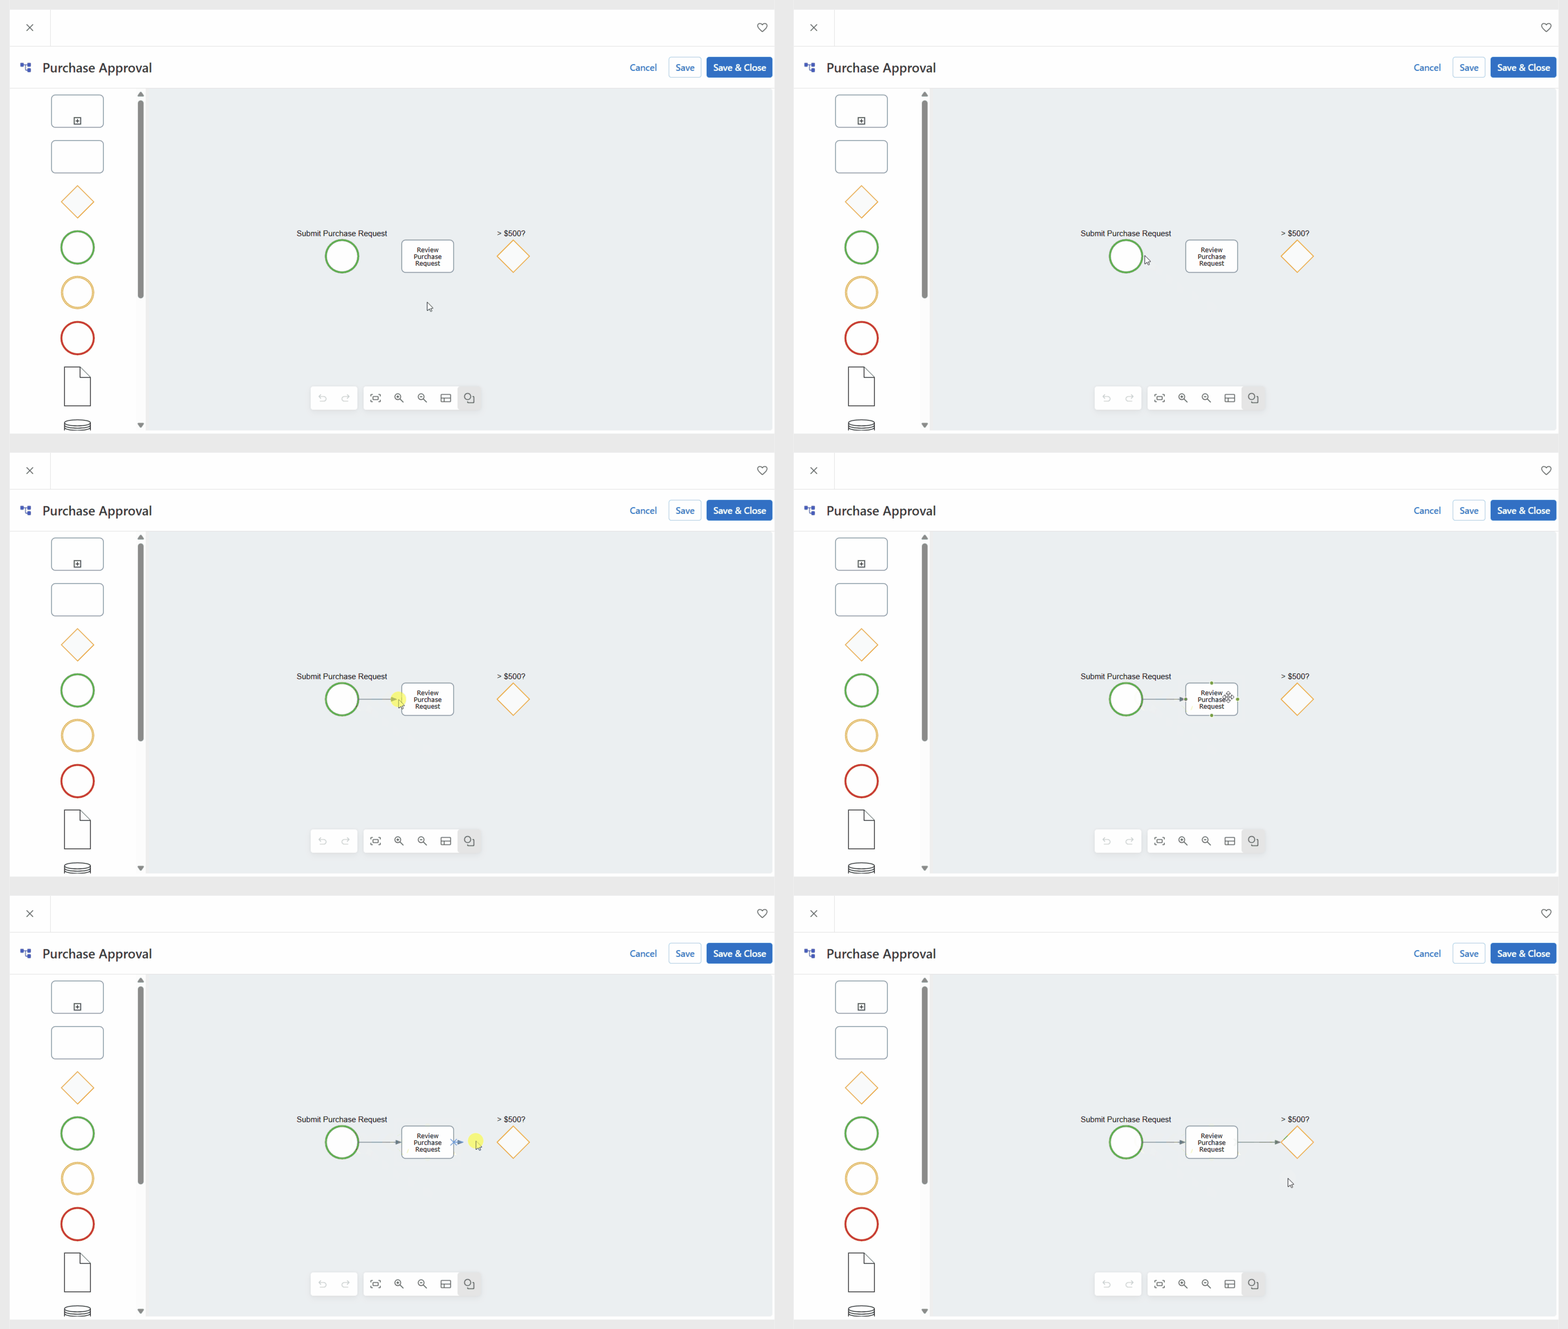
Sequence flows define the **order in which flow objects are executed** in a process.&#x20;

<figure><img src="https://content.gitbook.com/content/AgpNu7XmgN3Z9B8kIShD/blobs/qXy4Sta0BjrnQLkOtJtm/IMS-V161-BPM-EPD-3.gif" alt=""><figcaption></figcaption></figure>

{% hint style="warning" %}

#### Sequence Flow Rules

Each flow connects a **source** object to a **target** object.

* A **target** object may have one or more **incoming flows**.
* A **source** object may have one or more **outgoing flows**.
* <mark style="color:green;">**Start Events**</mark> can only be **sources**; they cannot have incoming flows.
* <mark style="color:red;">**End Events**</mark> can only be **targets**; they cannot have outgoing flows.
  {% endhint %}

{% stepper %}
{% step %}

### Creating a Sequence Flow

To connect two shapes with a sequence flow:

* Hover over the source object to display the green port points.
* Click a port point and drag toward the target object.
* Release the connector on the appropriate target port.

***

{% endstep %}

{% step %}

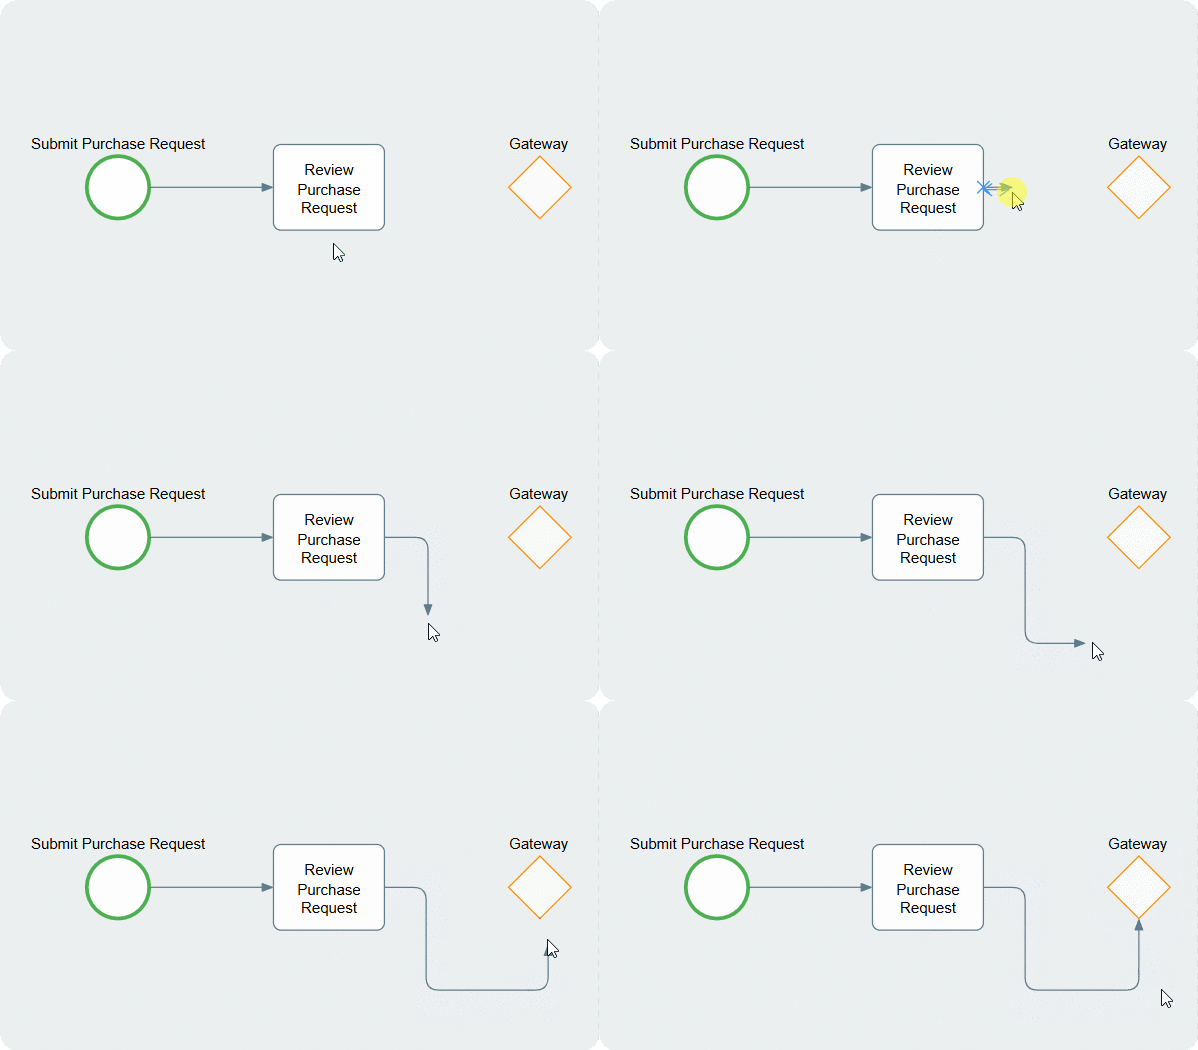
### Changing Flow Direction

To adjust the path of a sequence flow:

* Start dragging from the source object.
* Move the cursor in the desired direction (left, right, straight).
* Click to create a turning point (bend), then continue dragging to guide the flow path.

<figure><img src="https://content.gitbook.com/content/AgpNu7XmgN3Z9B8kIShD/blobs/dDliw64f1k1kb9kxqwID/IMS-V16-Library-Edit-Proc-Map-9.gif" alt="" width="449"><figcaption></figcaption></figure>

***

{% endstep %}

{% step %}

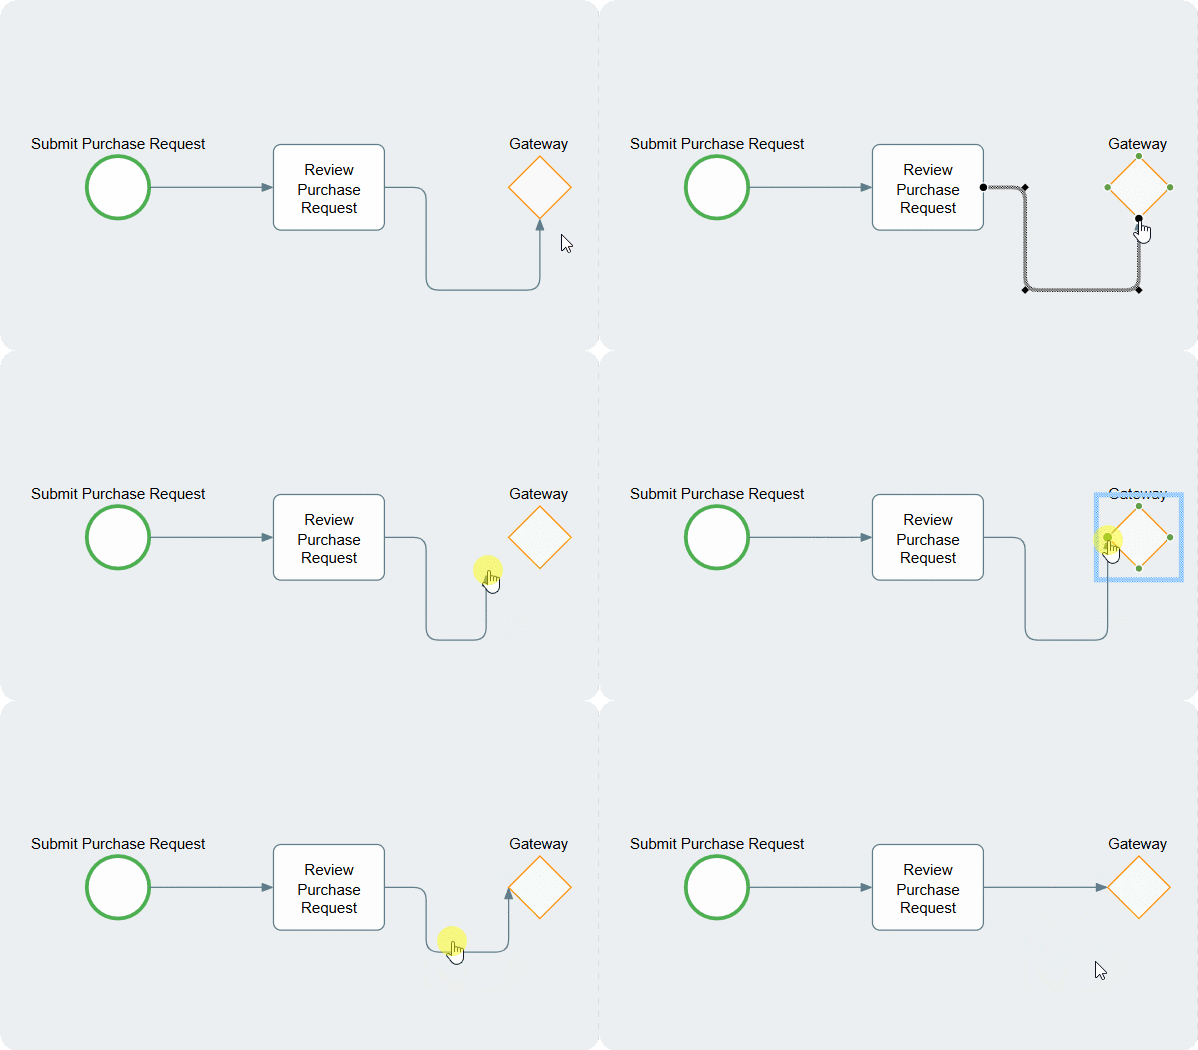
### Adjusting Source or Target Ports

To change the connection point of a sequence flow:

* Click the sequence flow between two objects. Black handles will appear at each end.
* Drag a handle to a new port on the source or target object.
* Release to reconnect.

<figure><img src="https://content.gitbook.com/content/AgpNu7XmgN3Z9B8kIShD/blobs/tSt1a5kmHrLPKUKzB6yn/IMS-V16-Library-Edit-Proc-Map-10.gif" alt="" width="449"><figcaption></figcaption></figure>

{% hint style="info" %}
To fine-tune the flow path, click and drag the arrow line.
{% endhint %}

***

{% endstep %}
{% endstepper %}

***

## Assigning Inputs & Outputs

Assign inputs and outputs to the appropriate sequence flows to ensure that the transfer of work is clear, consistent, and traceable.

{% hint style="info" %}
**Inputs** and **outputs** define how work moves between activities in a process.

* **Inputs** identify what an activity requires to begin.
* **Outputs** identify what the activity produces when it is complete.

For added clarity, each input and output can include a **state** to describe its condition as it enters or leaves an activity.
{% endhint %}

{% stepper %}
{% step %}

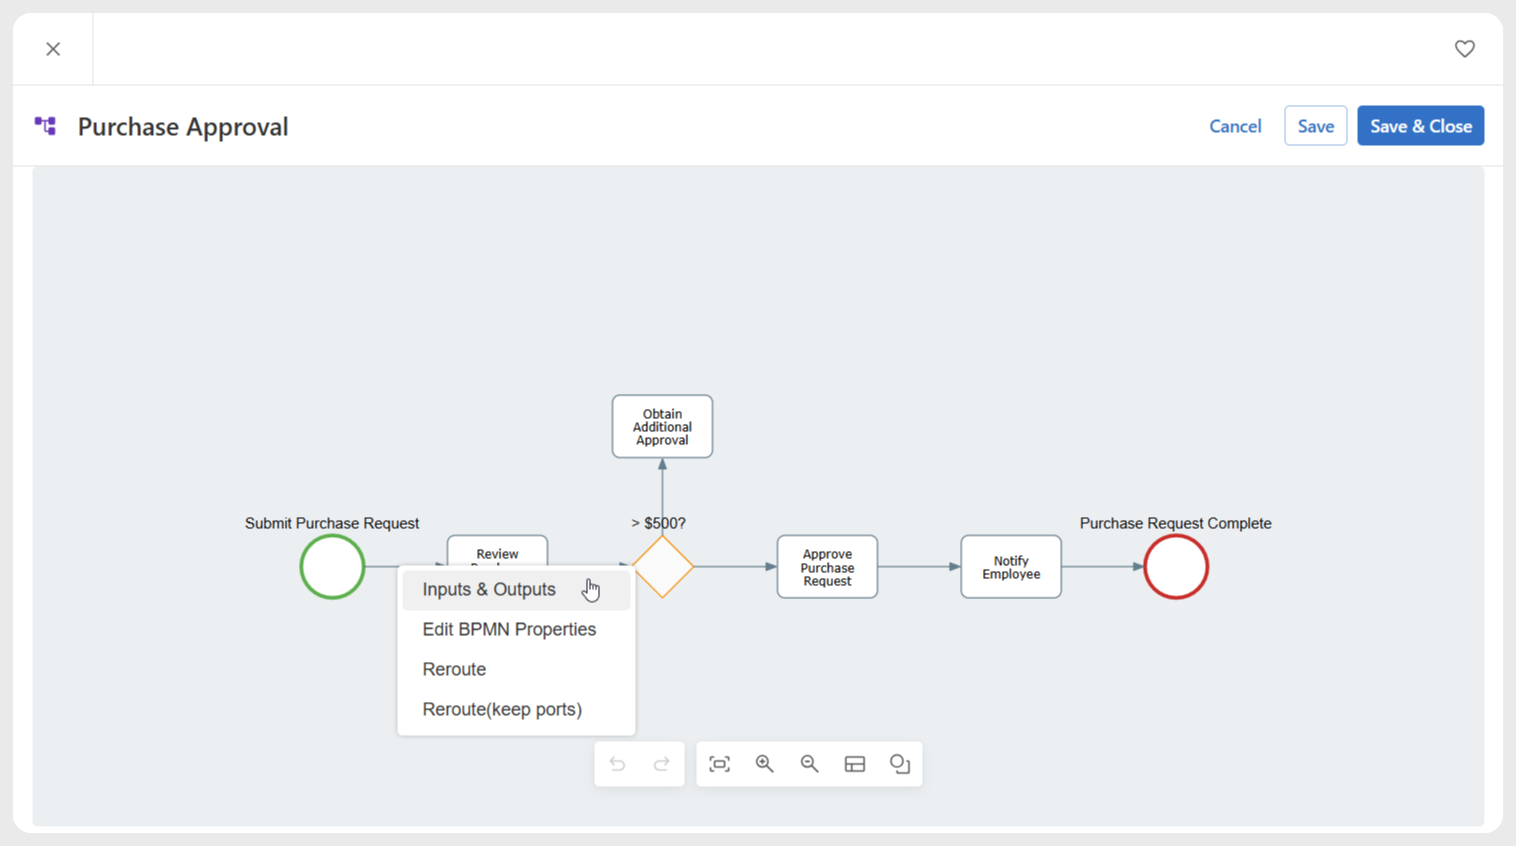
### Selecting a Sequence Flow

* In the **Diagram Editor**, right-click the desired flow.
* From the context menu, select **Inputs & Outputs**.

<figure><img src="https://content.gitbook.com/content/AgpNu7XmgN3Z9B8kIShD/blobs/uE7dLFoovRPPA1RxXhuV/IMS-V161-BPM-EPD-4-1.png" alt=""><figcaption></figcaption></figure>

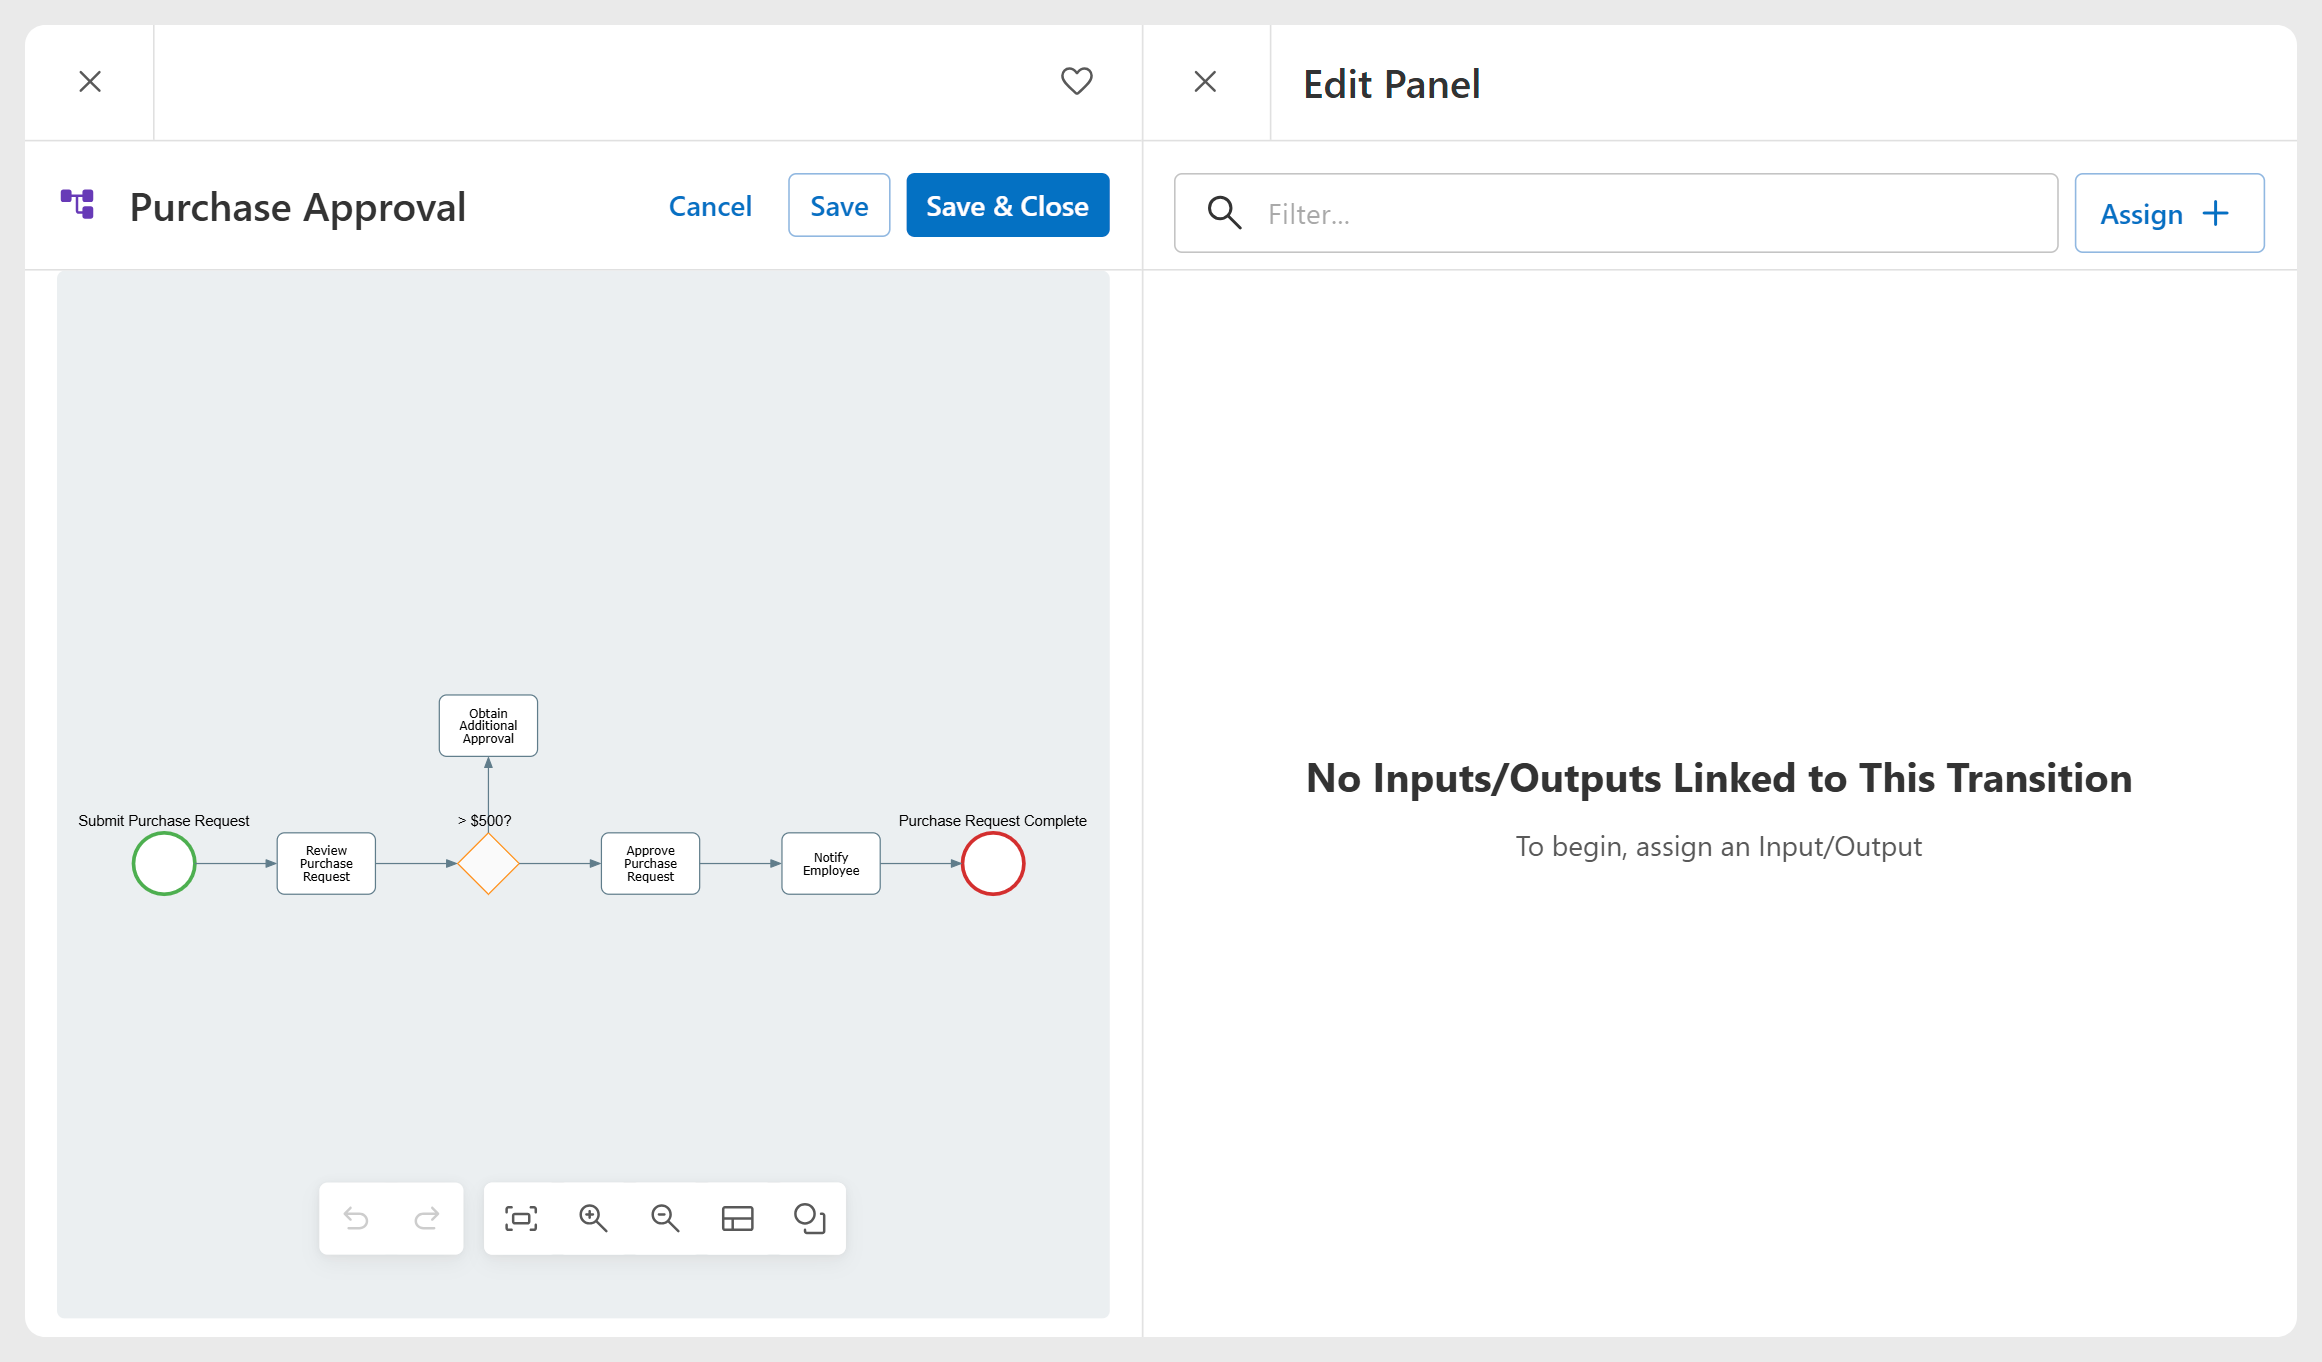
* The **Inputs & Outputs** panel opens, displaying all currently assigned items.

<figure><img src="https://content.gitbook.com/content/AgpNu7XmgN3Z9B8kIShD/blobs/dbnrSF5PlwgtkPXXYgxQ/IMS-V161-BPM-EPD-4-2.png" alt=""><figcaption></figcaption></figure>

{% hint style="success" %}

#### Filtering Items

Use the [**Keyword Filter**](/interfacing-help-files/interfacing-help-files-fr/end-users/list-view-management/searching-and-filtering-in-list-view.md#searching-with-keywords) at the top of the panel to search for specific items. The list updates automatically as you type.
{% endhint %}

***

{% endstep %}

{% step %}

### Assigning Inputs & Outputs

Inputs and outputs can be added using either of the following methods:

**Option 1: Assigning Existing Items**

Use this method to reuse items already defined.

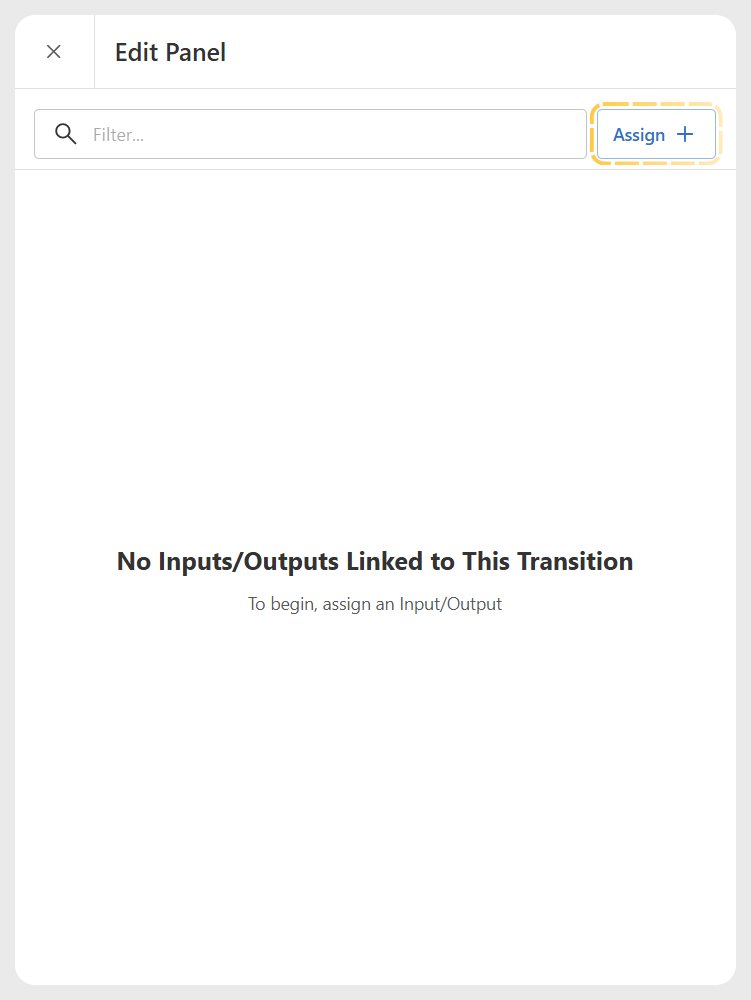
* In the panel, click **Assign** (top right).

<figure><img src="https://content.gitbook.com/content/AgpNu7XmgN3Z9B8kIShD/blobs/PNADegWOOTmKXk5LIcsl/IMS-V161-BPM-EPD-4-3.png" alt="" width="375"><figcaption></figcaption></figure>

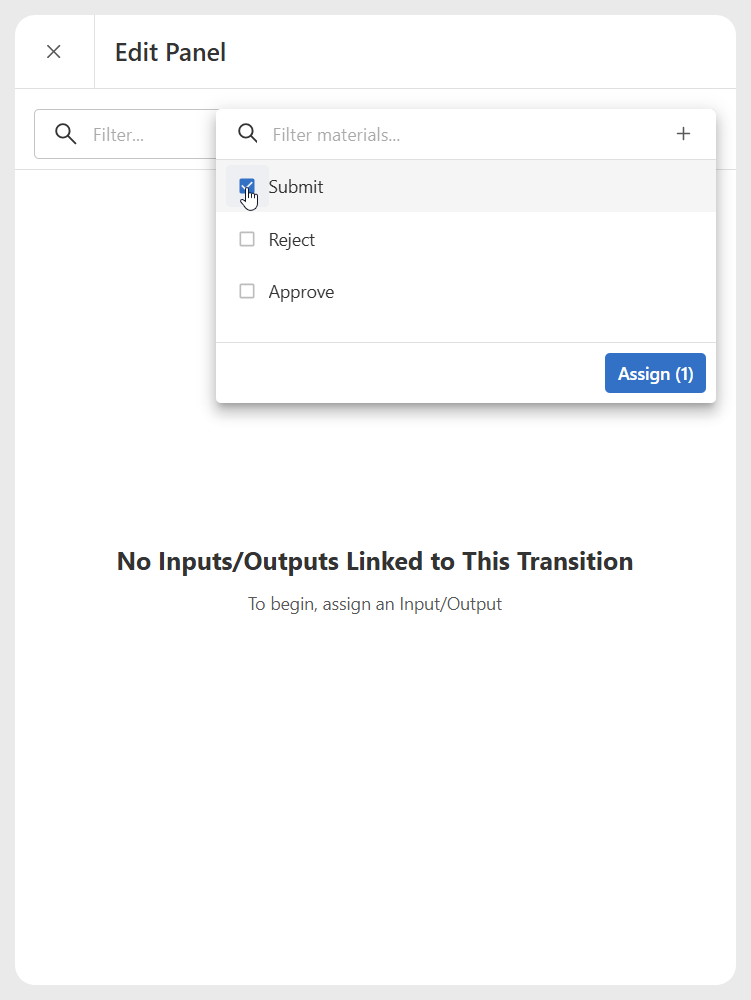
* A selection dialog opens, listing all previously defined items.
* Select one or more items using the available checkboxes.

<figure><img src="https://content.gitbook.com/content/AgpNu7XmgN3Z9B8kIShD/blobs/nAK52xViKWkbIgdAtIDR/IMS-V161-BPM-EPD-4-4.png" alt="" width="375"><figcaption></figcaption></figure>

* Click **Assign** to add the selected items to the flow.

{% hint style="success" %}
A **Keyword Filter** is also available in this dialog to help narrow the list.
{% endhint %}

**Option 2: Creating & Assigning New Items**

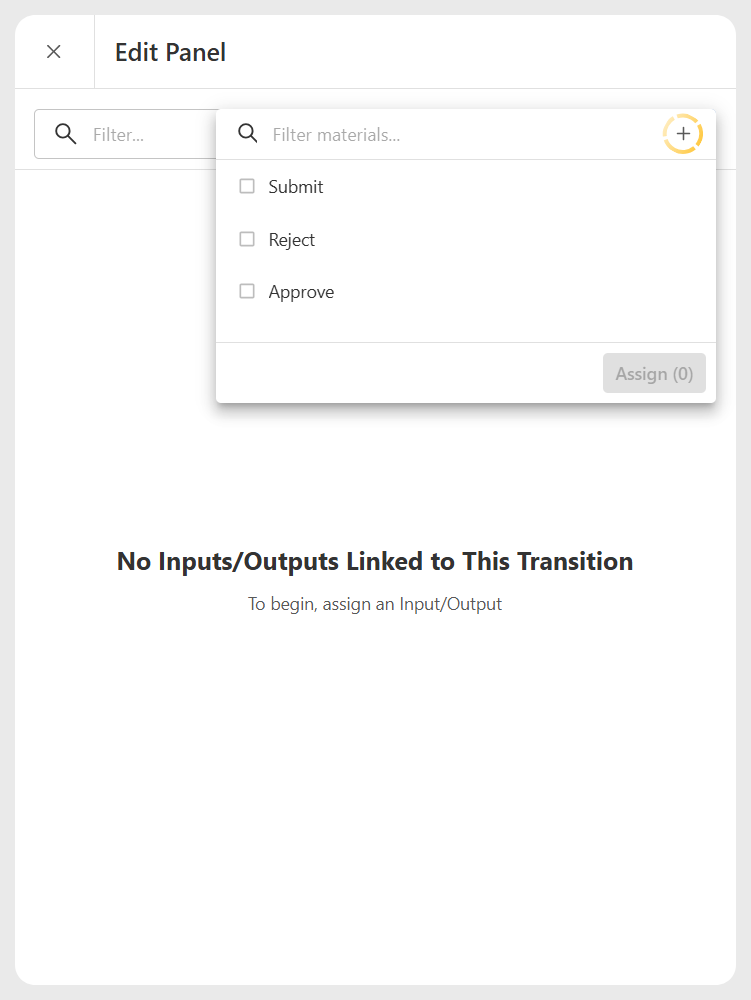
Use this method if the item you need does not already exist.

* In the selection dialog, click the <i class="fa-plus">:plus:</i> icon (top right).

<figure><img src="https://content.gitbook.com/content/AgpNu7XmgN3Z9B8kIShD/blobs/s3Haall4vQomefRhYenZ/IMS-V161-BPM-EPD-4-5.png" alt="" width="375"><figcaption></figcaption></figure>

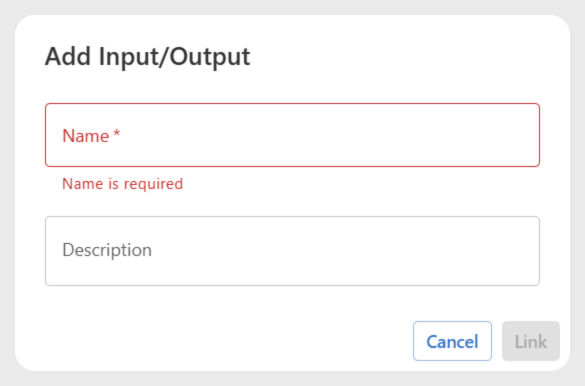
* A pop-up window appears. Enter the **Name** (required) and an optional **Description**.

<figure><img src="https://content.gitbook.com/content/AgpNu7XmgN3Z9B8kIShD/blobs/K8wOyiBompseDOn1U2bg/IMS-V161-BPM-EPD-4-6.png" alt="" width="293"><figcaption></figcaption></figure>

* Click **Link** to create and assign the item, or **Cancel** to exit without saving.

***

{% endstep %}

{% step %}

### Managing Assigned Inputs & Outputs

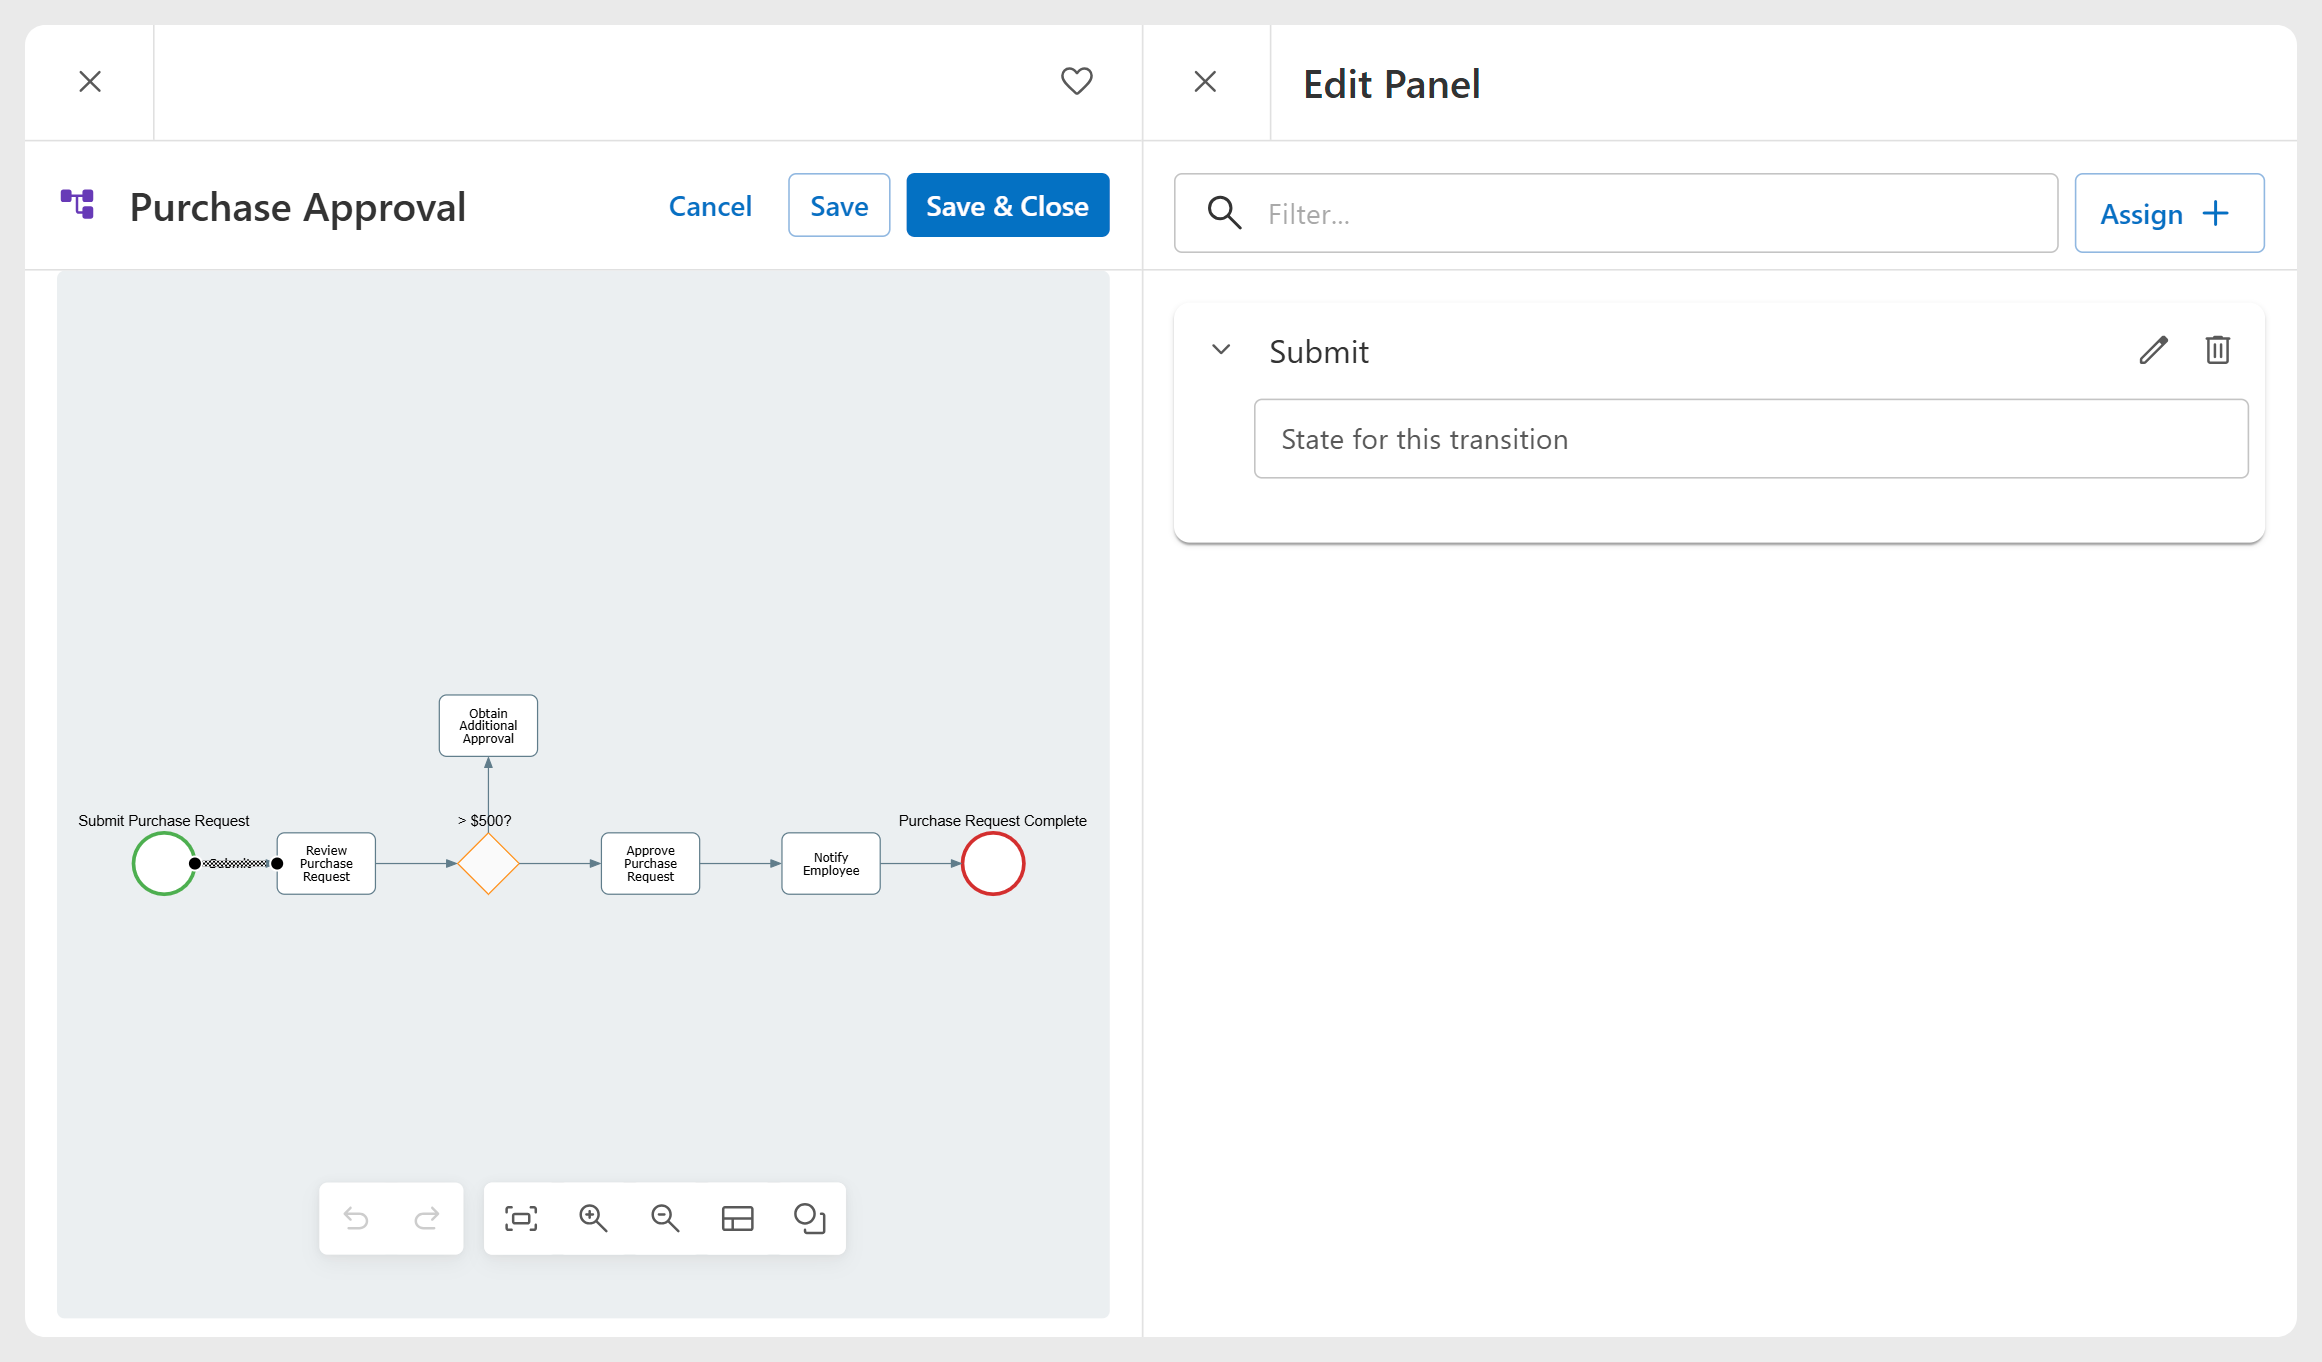
Assigned inputs and outputs appear as expandable sections in the panel.

<figure><img src="https://content.gitbook.com/content/AgpNu7XmgN3Z9B8kIShD/blobs/1hDYkvhs7VKayf9nI4IJ/IMS-V161-BPM-EPD-4-7.png" alt=""><figcaption></figcaption></figure>

* **State**: Click directly in the **State** field to create or update its value.
* **Edit** ( <i class="fa-pencil">:pencil:</i> ): Click to modify the item's details.
* **Delete** ( <i class="fa-trash-can">:trash-can:</i> ): Click to remove the item from the flow.

***

{% endstep %}
{% endstepper %}

***

## Assigning BPMN Properties

BPMN properties define the **logic, behavior, and rules** of the elements in your diagram. By configuring these properties, you determine how the process behaves during execution—for example, whether a task repeats, when events are triggered, or how gateways route the flow.

BPMN properties can be applied to:

* **Objects** (Tasks, Subprocesses, Gateways, Events)
* **Flows** (Sequence Flows, Message Flows, Associations)

{% stepper %}
{% step %}

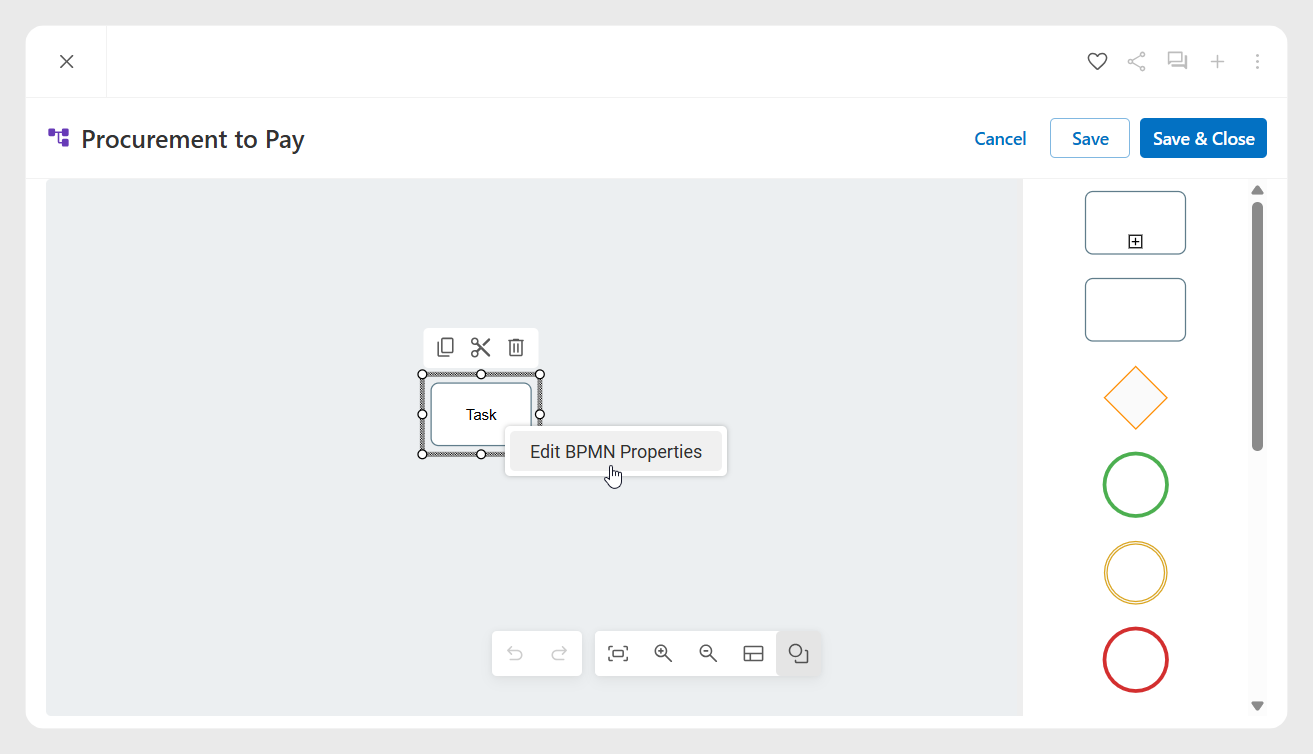
### Selecting the Element

* In the **Diagram Editor**, right-click the desired object or flow.&#x20;
* From the context menu, select **Edit BPMN Properties**.

<figure><img src="https://content.gitbook.com/content/AgpNu7XmgN3Z9B8kIShD/blobs/JpjRwccpebkGl2jtNGS5/IMS-V16-Library-Edit-Proc-BPMN-Prop.png" alt=""><figcaption></figcaption></figure>

***

{% endstep %}

{% step %}

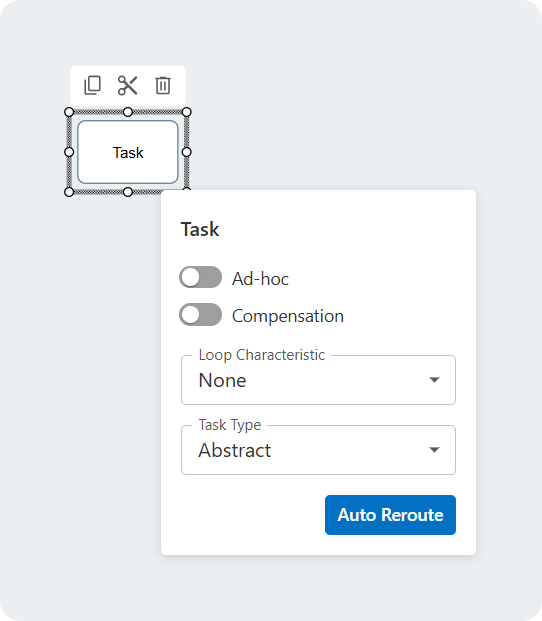
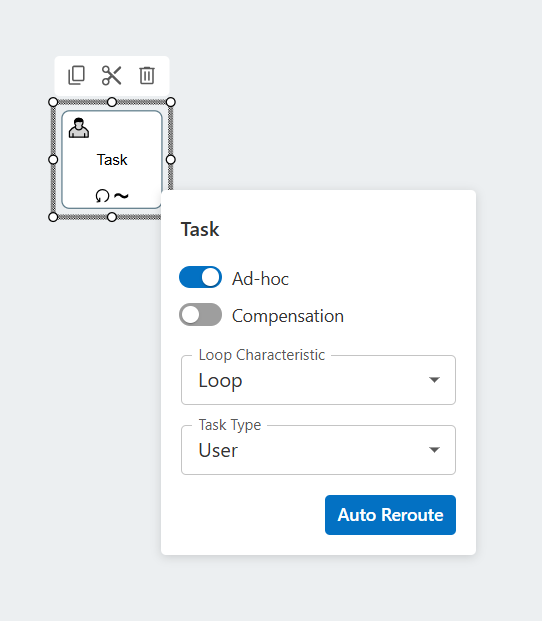
### Configuring Properties

* Adjust the settings in the **BPMN Properties** dialog.&#x20;
* Changes apply immediately as you set each property.

<div><figure><img src="https://content.gitbook.com/content/AgpNu7XmgN3Z9B8kIShD/blobs/kVCuWUkNk6nEiQ8BrZRC/IMS-V16-Library-Edit-Proc-BPMN-Prop-1.png" alt=""><figcaption></figcaption></figure> <figure><img src="https://content.gitbook.com/content/AgpNu7XmgN3Z9B8kIShD/blobs/UJpzUUfGuP9ByZuny8v7/IMS-V16-Library-Edit-Proc-BPMN-Prop-1-1.png" alt=""><figcaption></figcaption></figure></div>

{% hint style="info" %}
To close the dialog box, select **Done** or click anywhere outside it.
{% endhint %}

***

{% endstep %}
{% endstepper %}

For guidance on configuring BPMN properties per element, refer to the following guide:

<table data-view="cards"><thead><tr><th></th><th></th><th data-hidden data-card-target data-type="content-ref"></th><th data-hidden data-card-cover data-type="image"></th></tr></thead><tbody><tr><td><strong>How to Edit BPMN Properties for Objects &#x26; Flows</strong></td><td>Use BPMN properties to define and control process behavior and logic.</td><td><a href="/interfacing-help-files/interfacing-help-files-fr/analystes-de-processus/business-process-management/creating-and-editing-process-diagrams/mapping-a-process/editing-bpmn-properties-for-objects-and-flows.md">Editing BPMN Properties for Objects &amp; Flows</a></td><td data-object-fit="cover"><a href="https://content.gitbook.com/content/AgpNu7XmgN3Z9B8kIShD/blobs/mnxNm627z3ffKIl3D711/IMS-V16-NAV-Library-Icons-94.png">IMS-V16-NAV-Library-Icons-94.png</a></td></tr></tbody></table>

***

## Tips & Tricks

{% stepper %}
{% step %}

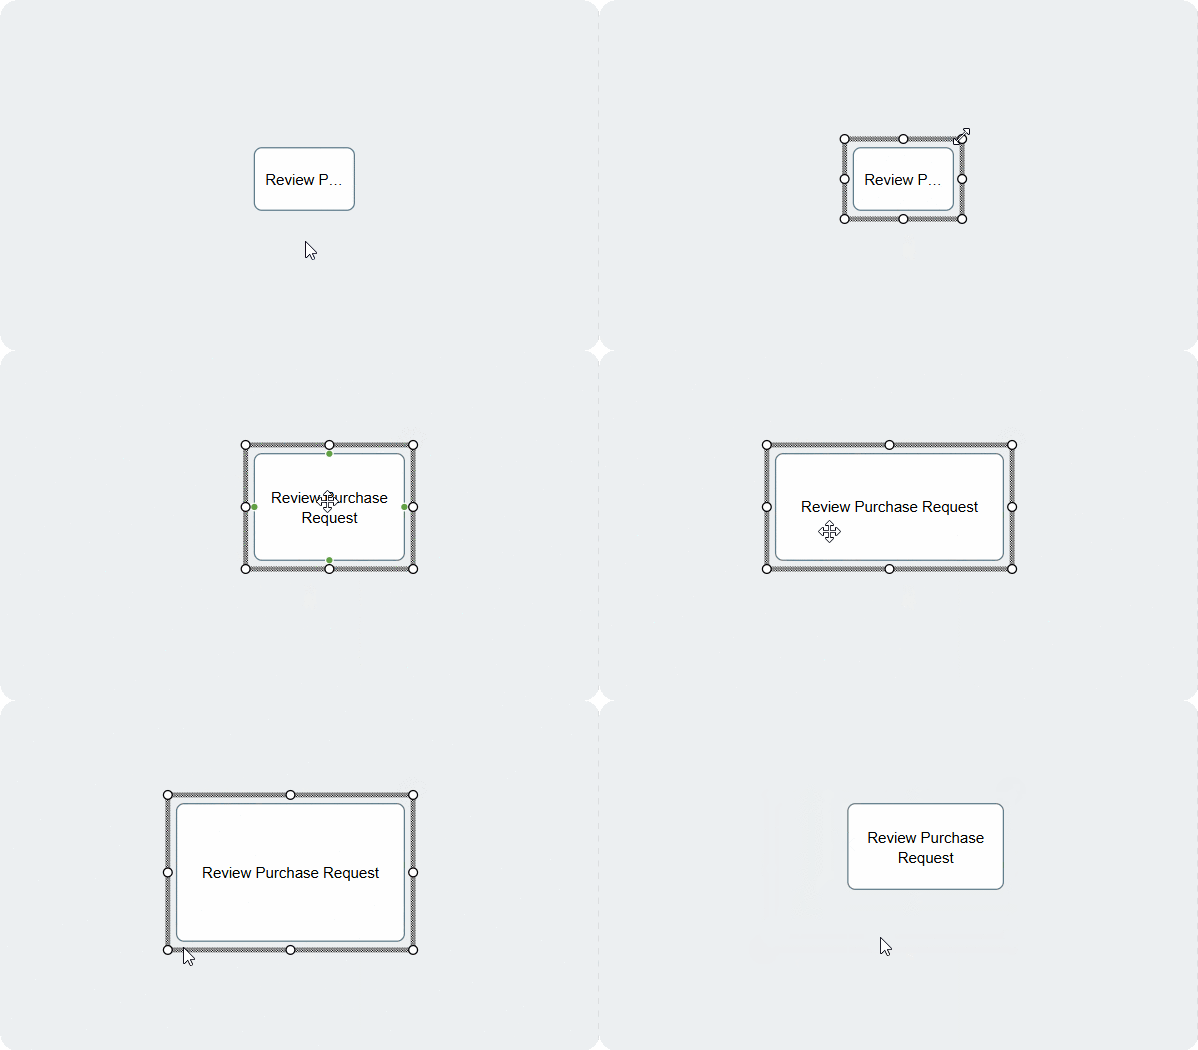
### Resizing Shapes

To resize a shape:

* Select the shape. Corner and side handles will appear on its edges.
* Hover over a handle until the cursor changes to a double-sided arrow (<i class="fa-arrows-up-down">:arrows-up-down:</i>).
* Click and drag to adjust the size.

<figure><img src="https://content.gitbook.com/content/AgpNu7XmgN3Z9B8kIShD/blobs/mGiBK6RWLsvnQhq2CY0H/IMS-V16-Library-Edit-Proc-Map-4.gif" alt="" width="449"><figcaption></figcaption></figure>

{% hint style="info" %}

#### Auto-Resize

The **Auto-Resize** behavior is determined by a system setting in EPC.

* If **enabled**, the shape will automatically expand to fit the full text.&#x20;
* If **disabled**, the shape size remains fixed, and text that is too long will be truncated with an ellipsis ( <i class="fa-ellipsis">:ellipsis:</i> ) to indicate overflow.
  {% endhint %}

***

{% endstep %}

{% step %}

### Multi-Selecting Shapes

You can select multiple shapes using either of the following methods:

**Option 1: Using a Selection Box**

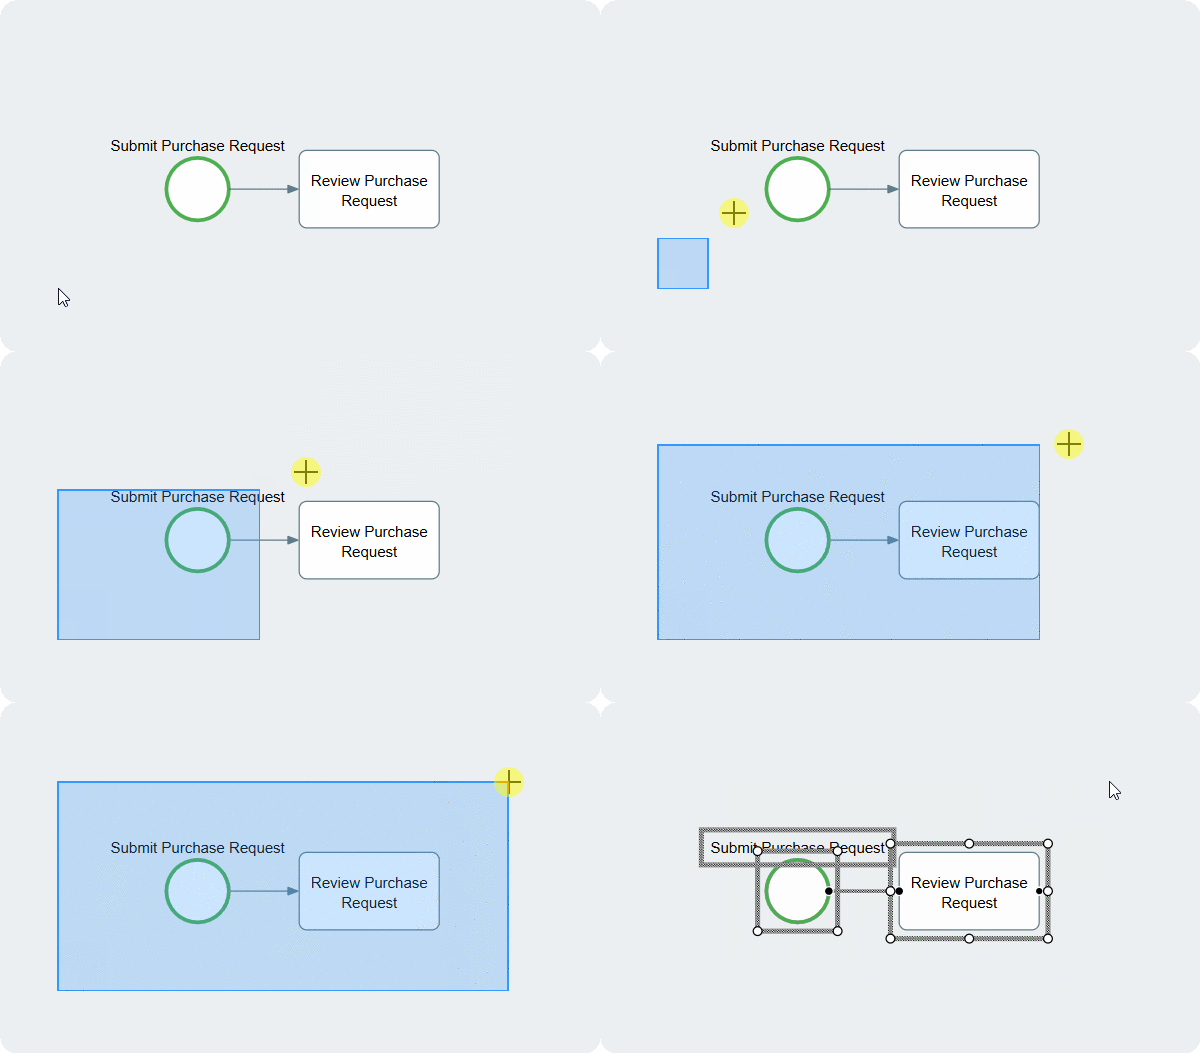
* Click and drag across the canvas to draw a selection box.
* Release the mouse button to select all objects inside.

<figure><img src="https://content.gitbook.com/content/AgpNu7XmgN3Z9B8kIShD/blobs/9yFYLiYWRWVzyrT5EMng/IMS-V16-Library-Edit-Proc-Map-5.gif" alt="" width="450"><figcaption></figcaption></figure>

<mark style="color:red;">**Option 2: Using the Auto-Select Shortcut**</mark>

* <mark style="color:red;">Select any flow object.</mark>
* <mark style="color:red;">Press</mark> <mark style="color:red;"></mark><kbd><mark style="color:red;">**Ctrl**<mark style="color:red;"></kbd><mark style="color:red;">**&#x20;**</mark><mark style="color:red;">**+**</mark><mark style="color:red;">**&#x20;**</mark><kbd><mark style="color:red;">**C**<mark style="color:red;"></kbd> <mark style="color:red;"></mark><mark style="color:red;">(Windows) or</mark> <mark style="color:red;"></mark><kbd><mark style="color:red;">**Cmd**<mark style="color:red;"></kbd><mark style="color:red;">**&#x20;**</mark><mark style="color:red;">**+**</mark><mark style="color:red;">**&#x20;**</mark><kbd><mark style="color:red;">**C**<mark style="color:red;"></kbd> <mark style="color:red;"></mark><mark style="color:red;">(Mac), then click a blank area of the canvas.</mark>
* <mark style="color:red;">All objects on the canvas will be selected automatically.</mark>

<mark style="color:red;">\[</mark><mark style="color:red;">**Note to MC:**</mark> <mark style="color:red;"></mark><mark style="color:red;">This is currently not functional as a method. Is it in scope for V1 or should it be removed?]</mark>

{% hint style="info" %}
Once selected, you can **move**, **copy**, **cut**, **delete**, or **assign responsibilities**.
{% endhint %}

***

{% endstep %}

{% step %}

### Moving Flow Objects or the Diagram

**To move a flow object:**

* Hover over the object until the four-way arrow ( <i class="fa-arrows-up-down-left-right">:arrows-up-down-left-right:</i> ) appears, then click and drag.

<figure><img src="https://content.gitbook.com/content/AgpNu7XmgN3Z9B8kIShD/blobs/yeANjX7fn7KG9ZfI6Qlf/IMS-V16-Library-Edit-Proc-Map-6.gif" alt="" width="449"><figcaption></figcaption></figure>

**To move the entire diagram:**&#x20;

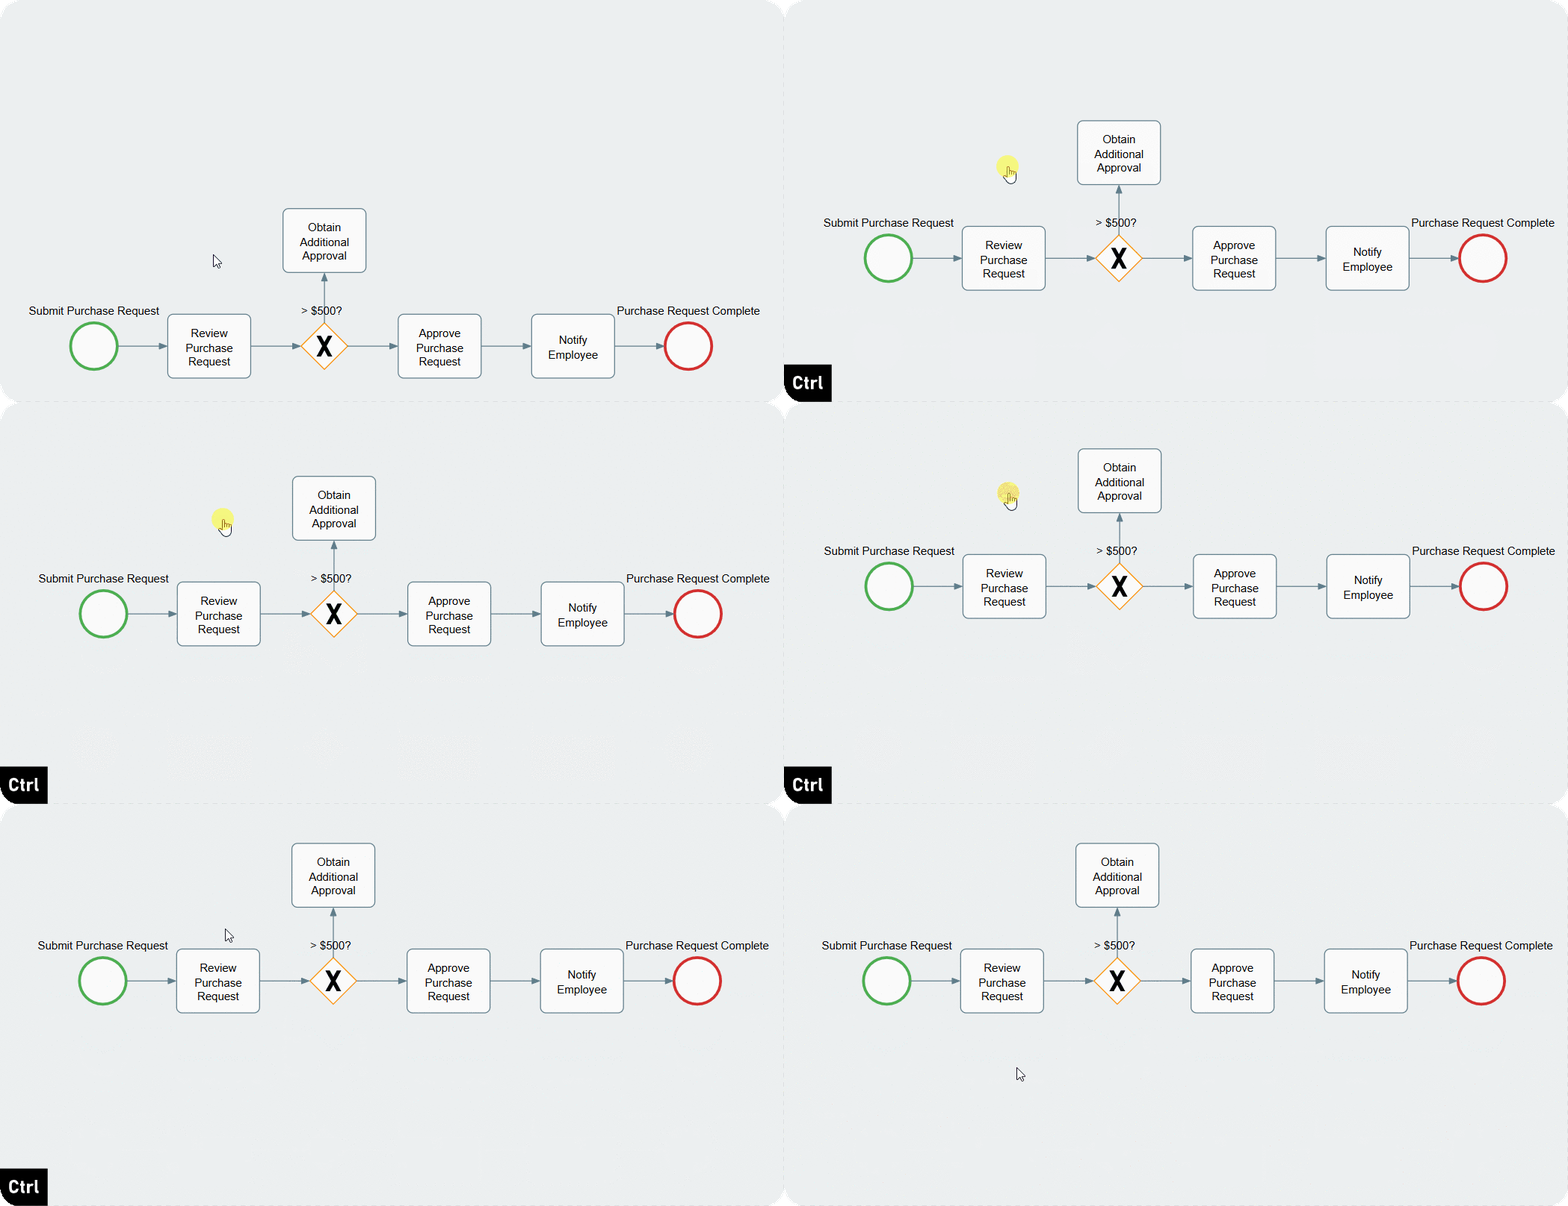
* Hold <kbd>**Ctrl**</kbd> (Windows) or <kbd>**Cmd**</kbd> (Mac), click and hold on any blank area of the canvas, then drag.

<figure><img src="https://content.gitbook.com/content/AgpNu7XmgN3Z9B8kIShD/blobs/Sx82QBoQpoeH37IMxHNX/IMS-V16-Library-Edit-Proc-Map-7.gif" alt="" width="563"><figcaption></figcaption></figure>

***

{% endstep %}

{% step %}

### Resizing Lanes

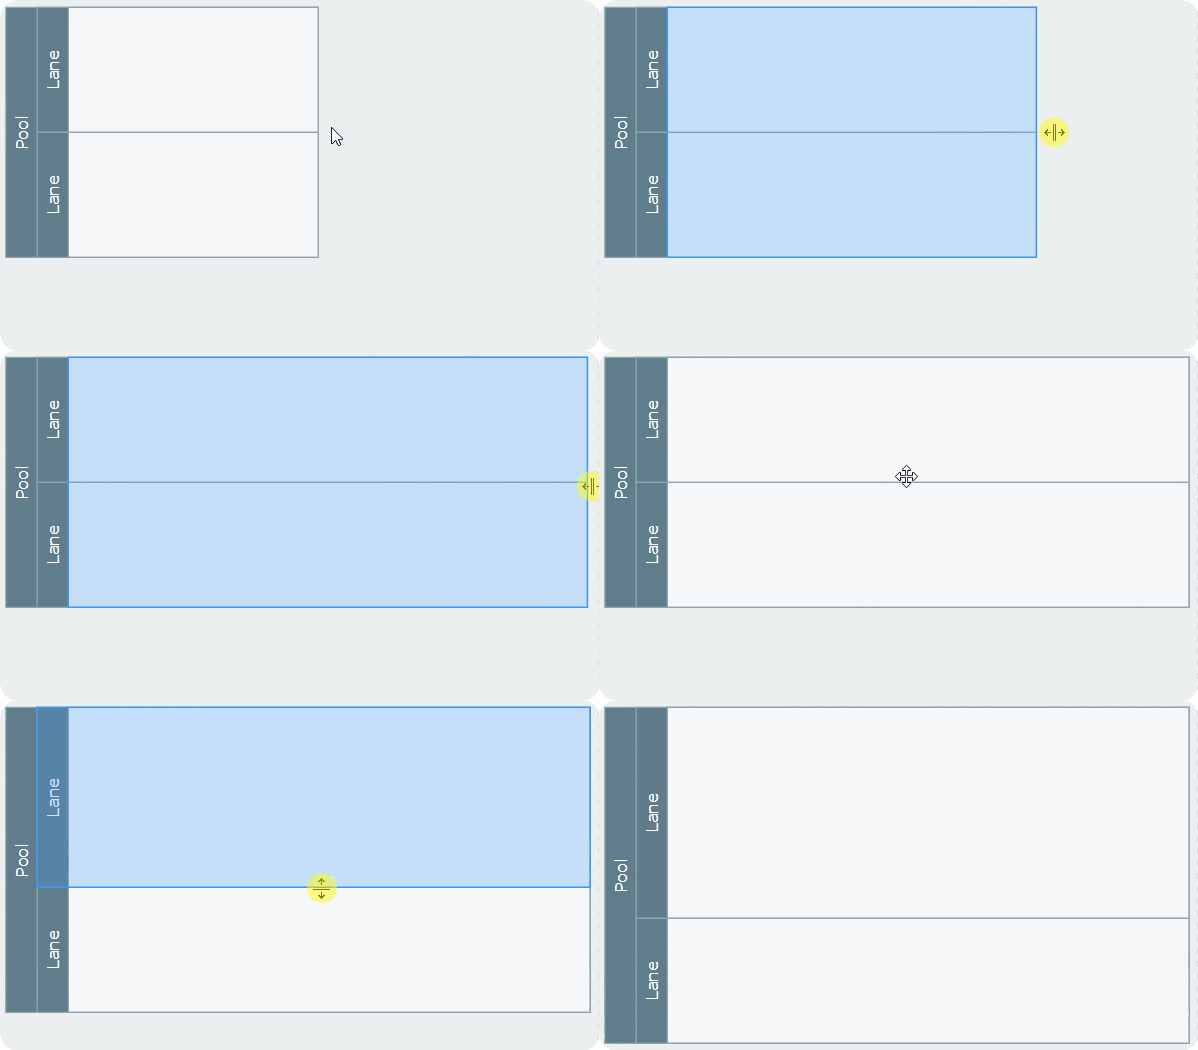
To resize a lane:

* Hover over the outer or bottom edge of the lane until the cursor changes to a resize arrow.
* Click and drag to adjust width or height.

<figure><img src="https://content.gitbook.com/content/AgpNu7XmgN3Z9B8kIShD/blobs/i1YLioGVfTFNLKRIKDok/IMS-V16-Library-Edit-Proc-Map-13.gif" alt="" width="449"><figcaption></figcaption></figure>

***

{% endstep %}

{% step %}

### Moving Lanes

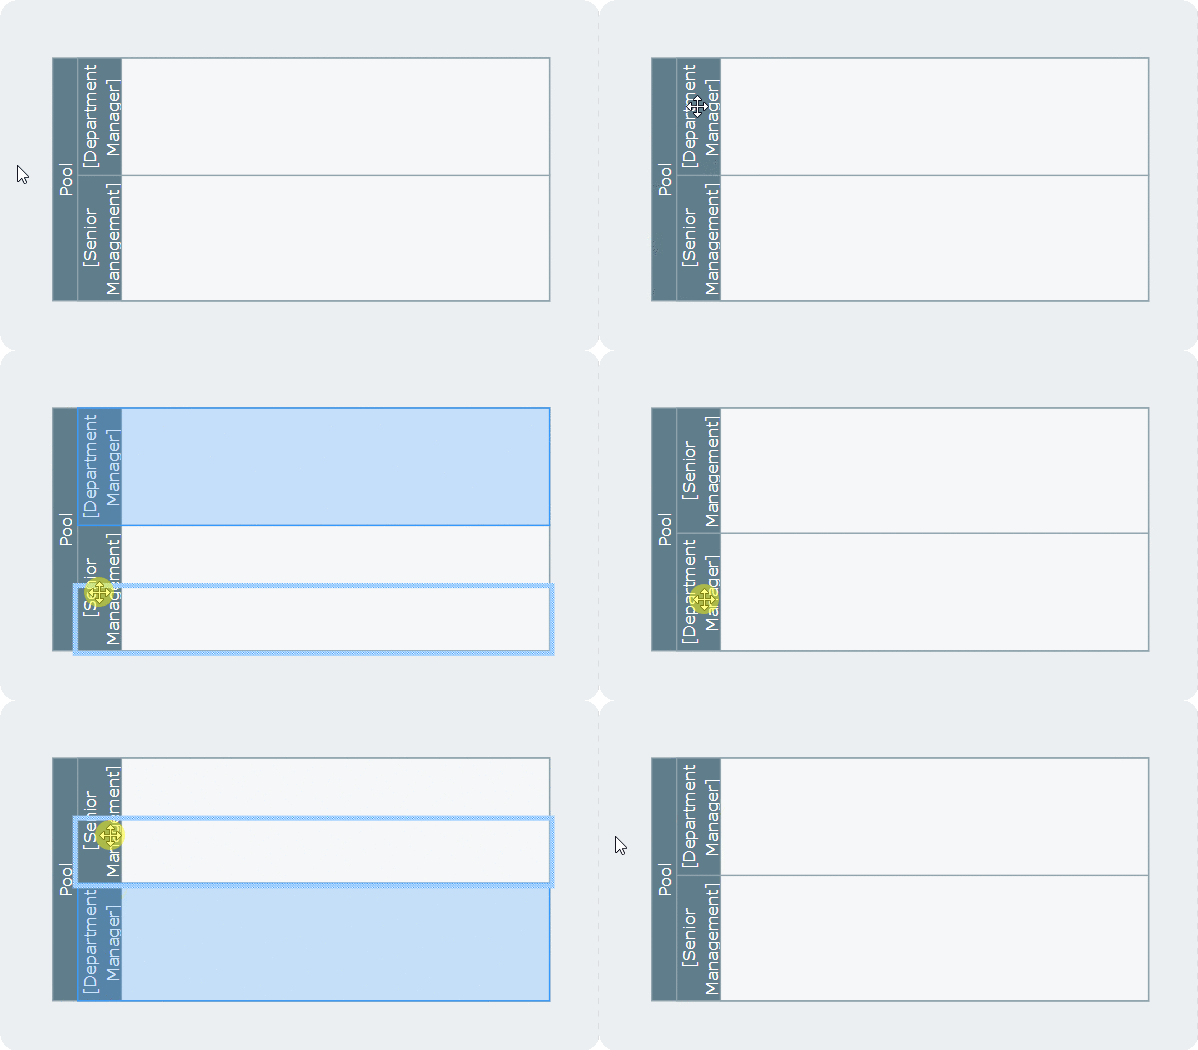
To move a lane:

* Hover over the lane header until the cursor changes to a four-directional arrow ( <i class="fa-arrows-up-down-left-right">:arrows-up-down-left-right:</i> ).&#x20;
* Click and drag to reposition the lane.

<figure><img src="https://content.gitbook.com/content/AgpNu7XmgN3Z9B8kIShD/blobs/8QQMbcbNHxv1oRA6UCiP/IMS-V16-Library-Edit-Proc-Map-14.gif" alt="" width="449"><figcaption></figcaption></figure>

{% hint style="info" %}
To move the entire diagram, hover over it until the move cursor appears, then drag.
{% endhint %}

***

{% endstep %}

{% step %}

### Moving Objects Between Lanes

To move a flow object from one lane to another, simply drag it into the target lane.&#x20;

{% hint style="info" %}
The system ensures only one **R** is active per lane. When you move flow objects between lanes:

* Non-**R** RASCI-VS assignments remain **unchanged**.
* The **R value** of the moved object is **automatically updated** to match the **R** assigned to the lane.
  {% endhint %}

***

{% endstep %}

{% step %}

### Adding Assets & Artifacts

**Assets** and **artifacts** can be placed anywhere in a swimlane diagram. They are **independent of RASCI-VS** **roles** and are used to represent data or supporting materials relevant to the process.

<figure><img src="https://content.gitbook.com/content/AgpNu7XmgN3Z9B8kIShD/blobs/MuD9QqJKQNaV8OZDwgrQ/IMS-V16-Library-Edit-Proc-Map-16.png" alt="" width="563"><figcaption></figcaption></figure>

***

{% endstep %}

{% step %}

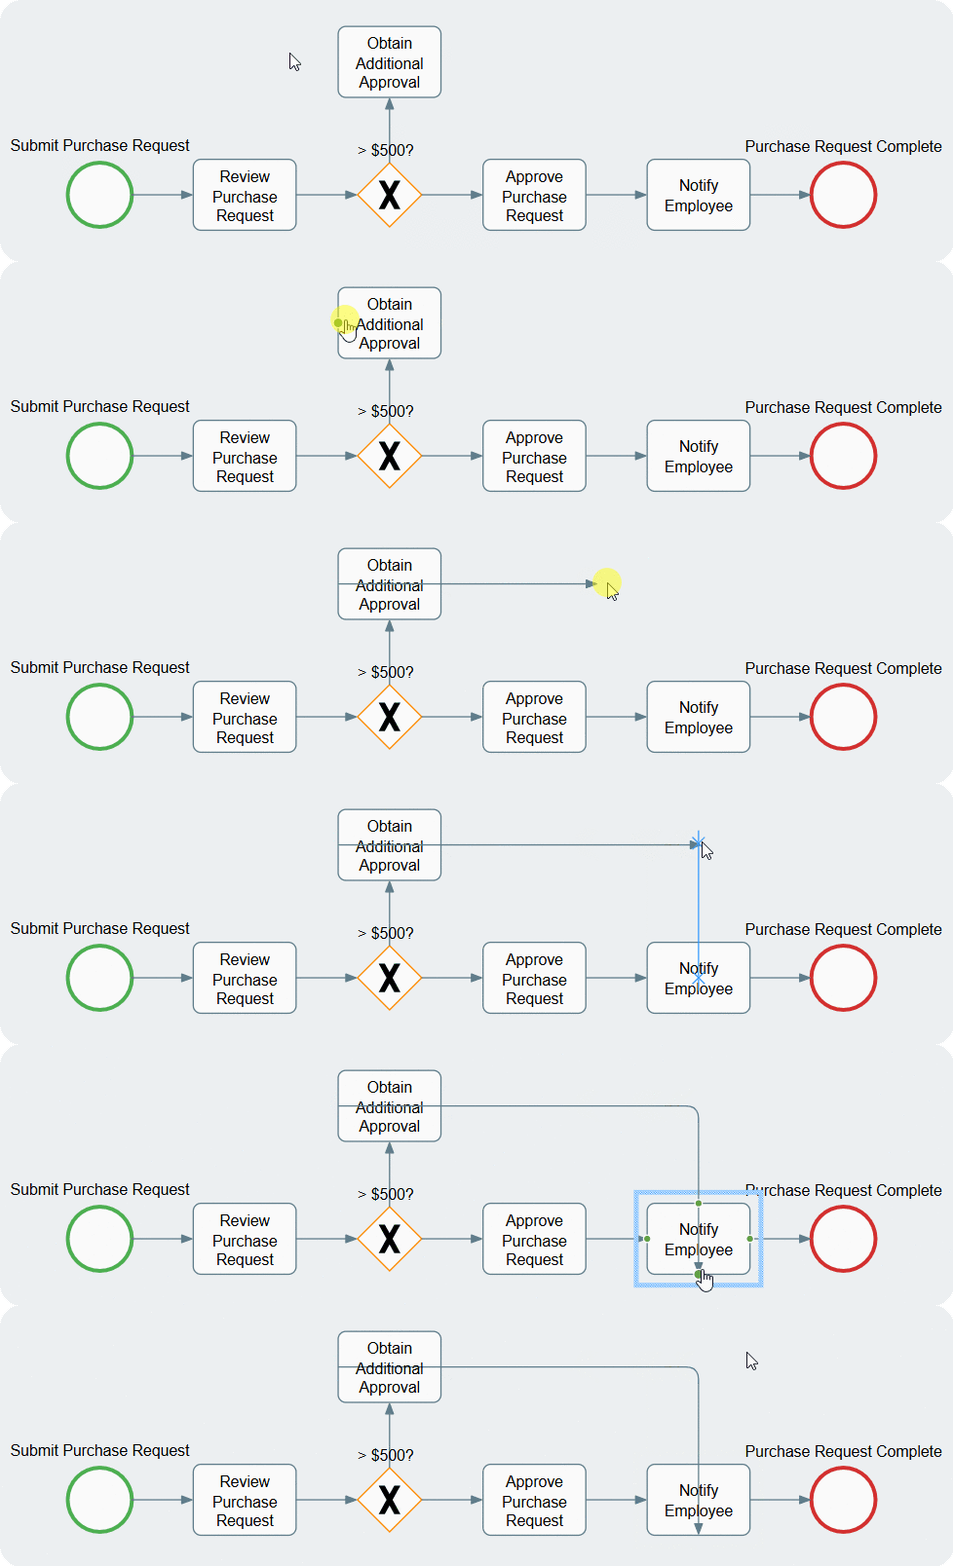
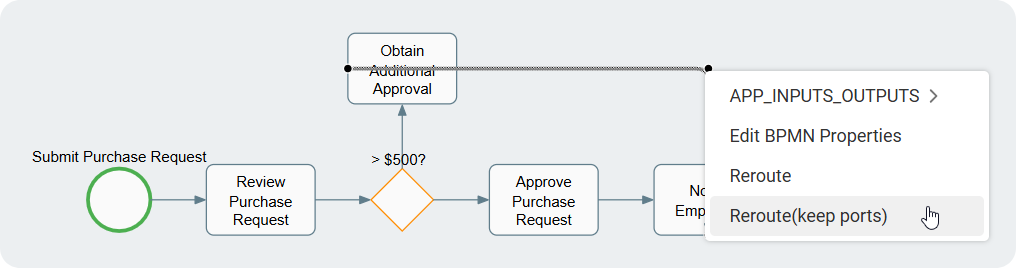
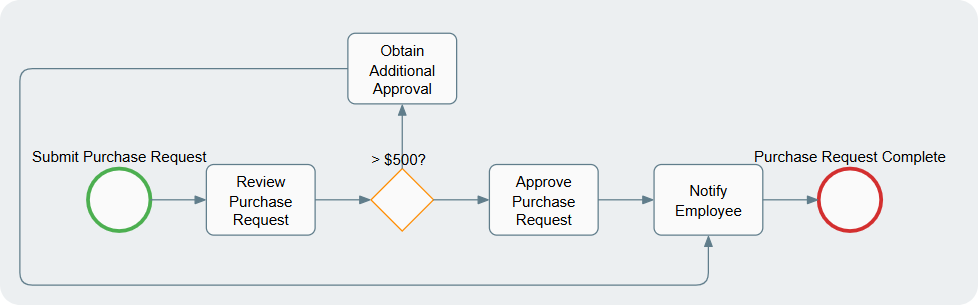
### Rerouting a Flow

Use the **Reroute** function to optimize flow paths in a process diagram, improving readability and minimizing line crossings.

In the **Diagram Editor**, flows can be rerouted in three ways:

{% stepper %}
{% step %}

#### Rerouting by Moving Ports

Use this method when you want the system to automatically determine the best connection points.

* Connect the shapes in the diagram.

<figure><img src="https://content.gitbook.com/content/AgpNu7XmgN3Z9B8kIShD/blobs/EziUKeucnVcPe77JJEAa/IMS-V16-Library-Edit-Proc-Reroute-6-1.gif" alt="" width="563"><figcaption></figcaption></figure>

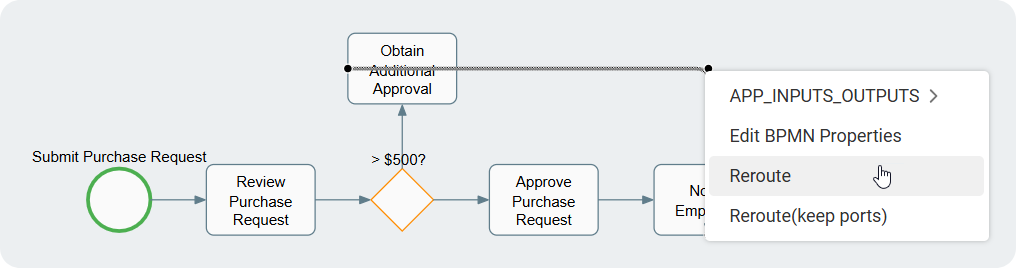
* Right-click the flow you want to adjust and select **Reroute** from the context menu.

<figure><img src="https://content.gitbook.com/content/AgpNu7XmgN3Z9B8kIShD/blobs/m1rBOgP9gkS4xHGSm764/IMS-V16-Library-Edit-Proc-Reroute-2.png" alt="" width="563"><figcaption></figcaption></figure>

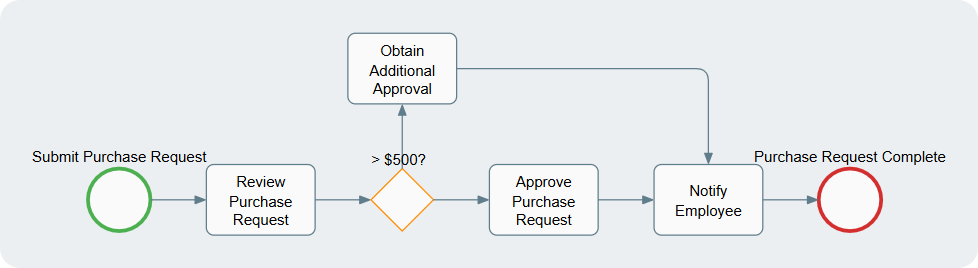
* The flow is redrawn, and ports are repositioned as needed.

<figure><img src="https://content.gitbook.com/content/AgpNu7XmgN3Z9B8kIShD/blobs/lBOccqNbZFLyxn3jGP2D/IMS-V16-Library-Edit-Proc-Reroute-3.png" alt="" width="563"><figcaption></figcaption></figure>

***

{% endstep %}

{% step %}

#### Rerouting Without Moving Ports

Use this method when you want to reroute flows but preserve existing port positions.

* Right-click the flow you want to adjust and select **Reroute (Keep Ports)** from the context menu.

<figure><img src="https://content.gitbook.com/content/AgpNu7XmgN3Z9B8kIShD/blobs/eurrlJVXFq6eL7lOTYvL/IMS-V16-Library-Edit-Proc-Reroute-4.png" alt="" width="563"><figcaption></figcaption></figure>

* The flow is redrawn without altering the port positions.

<figure><img src="https://content.gitbook.com/content/AgpNu7XmgN3Z9B8kIShD/blobs/k7gQ70HPatbosUem5xdl/IMS-V16-Library-Edit-Proc-Reroute-5.png" alt="" width="563"><figcaption></figcaption></figure>

***

{% endstep %}

{% step %}

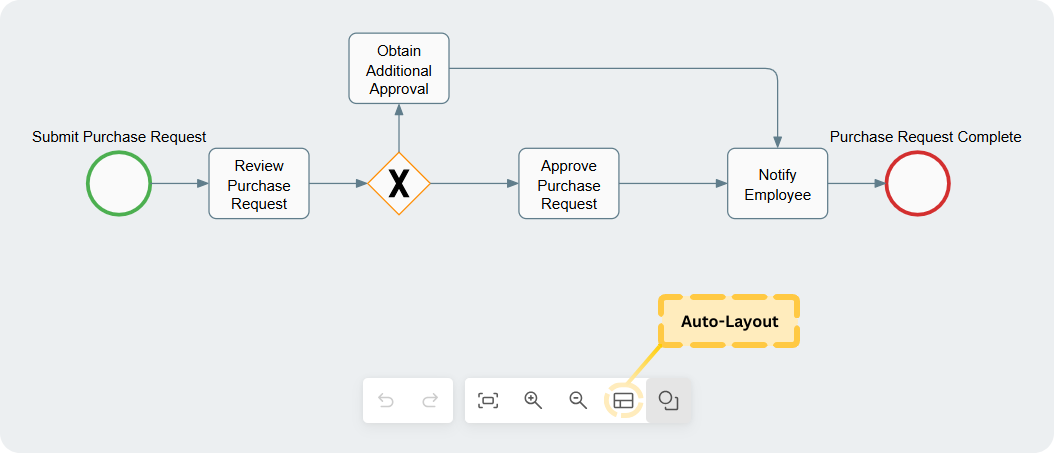
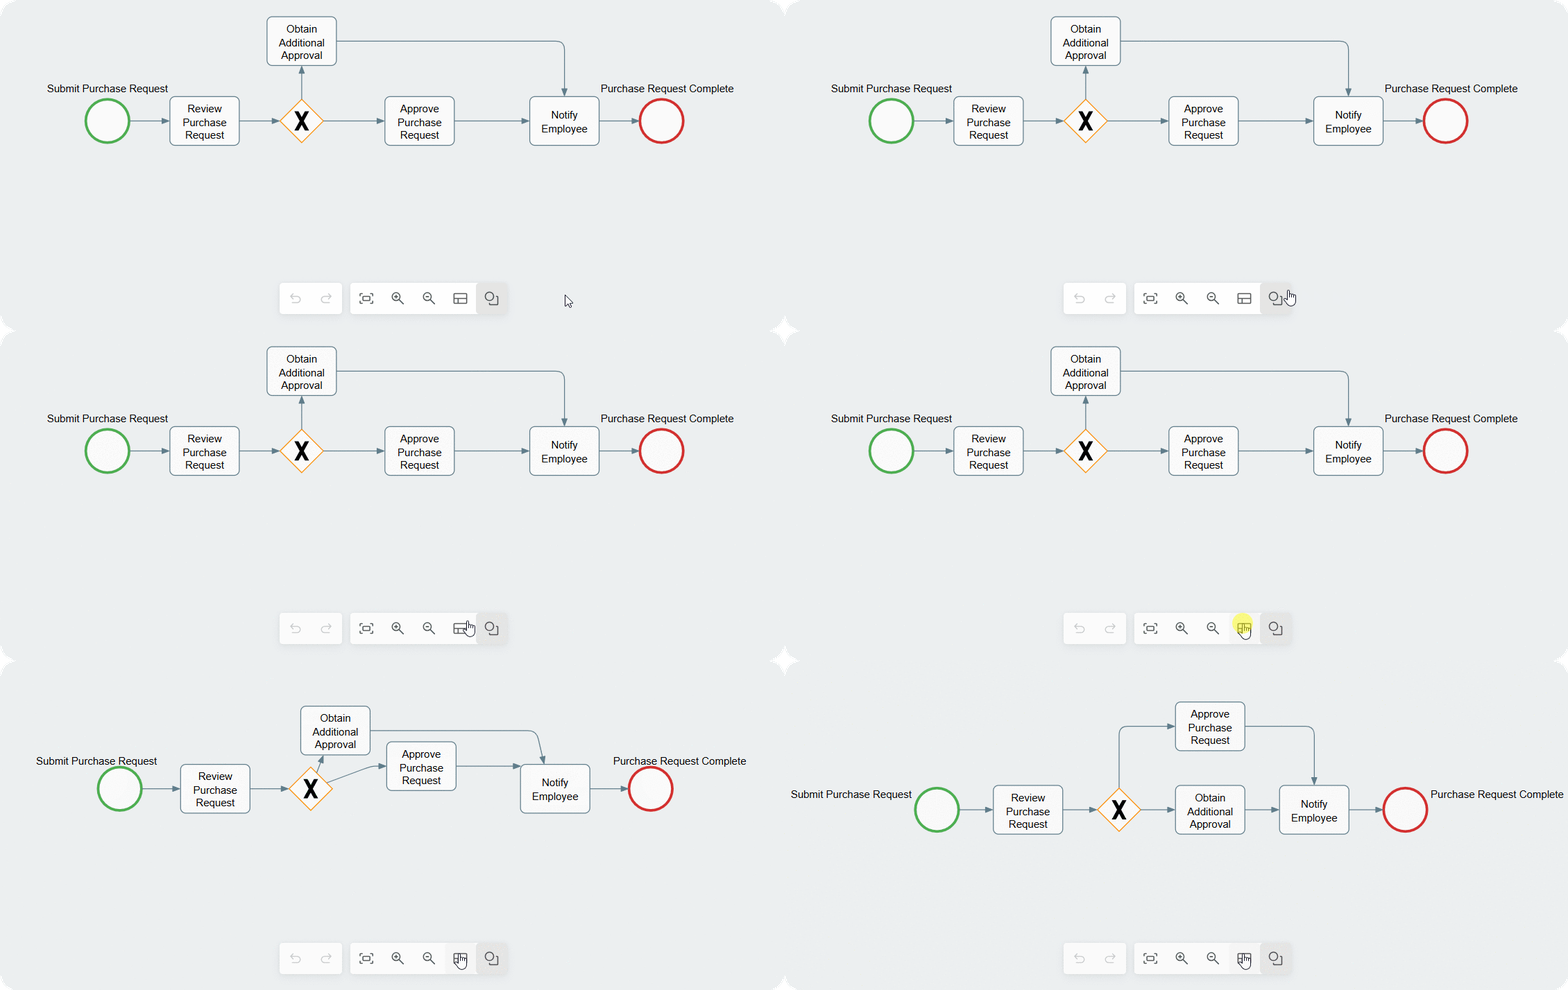
#### Rerouting with Auto-Layout

Use this method to reorganize the entire diagram for maximum clarity.

* Click the **Auto-Layout** icon in the **Editor** toolbar.

<figure><img src="https://content.gitbook.com/content/AgpNu7XmgN3Z9B8kIShD/blobs/eJiLVUPB0k4KbogTyIJA/IMS-V16-Library-Edit-Proc-Reroute-9-1.png" alt="" width="563"><figcaption></figcaption></figure>

* The diagram is automatically rearranged, with flows rerouted and overlapping lines minimized.

<figure><img src="https://content.gitbook.com/content/AgpNu7XmgN3Z9B8kIShD/blobs/UyhBNjPpLiY0y7BcpSD4/IMS-V16-Library-Edit-Proc-Reroute-9.gif" alt="" width="563"><figcaption></figcaption></figure>

***

{% endstep %}
{% endstepper %}

***

{% endstep %}
{% endstepper %}

***


---

# Agent Instructions
This documentation is published with GitBook. GitBook is the documentation platform designed so that both humans and AI agents can read, navigate, and reason over technical content effectively. Learn more at gitbook.com.

## Querying This Documentation
If you need additional information that is not directly available in this page, you can query the documentation dynamically by asking a question.

Perform an HTTP GET request on the current page URL with the `ask` query parameter, and the optional `goal` query parameter:

```
GET https://interfacing.gitbook.io/interfacing-help-files/interfacing-help-files-fr/analystes-de-processus/business-process-management/creating-and-editing-process-diagrams/mapping-a-process.md?ask=<question>&goal=<endgoal>
```

`ask` is the immediate question: it should be specific, self-contained, and written in natural language.
`goal` is optional and describes the broader end goal you are ultimately trying to accomplish on behalf of the user. GitBook uses it to tailor the answer towards what is most useful for that goal.

The response will contain a direct answer to the question and relevant excerpts and sources from the documentation.

Use this mechanism when the answer is not explicitly present in the current page, you need clarification or additional context, or you want to retrieve related documentation sections.